
Design system teams know the scenario well. You push a seemingly harmless update, a button's padding token adjusted by two pixels, and suddenly accordion menus misalign, modal footers overlap, and dropdown arrows sit crooked across forty components. No unit test caught it. No integration test flagged it. Yet users noticed immediately.
Design tokens are now the backbone of serious frontend work: a 2026 survey of roughly 300 practitioners put adoption at 84%, and the Design Tokens Community Group shipped its first stable spec. That consistency at scale is exactly the point. But scale breeds fragility: every shared component is a load-bearing dependency, and a single token edit is a domino that traditional test suites are blind to.
Visual regression testing for design systems is the only automated layer that catches those dominoes before users do. This guide covers why design systems need visual testing, how to implement a reliable workflow, the three diff engines that actually matter, and how to choose between commercial and open-source tools in 2026.
Why Do Design Systems Need Visual Regression Testing?
Why is visual regression testing critical for design systems? Design systems are interconnected networks where a single token change can cascade across dozens of components. Traditional unit and integration tests validate logic and data flow but cannot verify visual appearance. Visual regression testing catches the color shifts, alignment problems, and layout breakages that no other test type detects.
A design system is by nature an interconnected network of reusable components. Change one border-radius token in a foundation layer, and it propagates to cards, buttons, inputs, modals, and tables, each of which may render differently depending on its context, parent container, or responsive breakpoint.
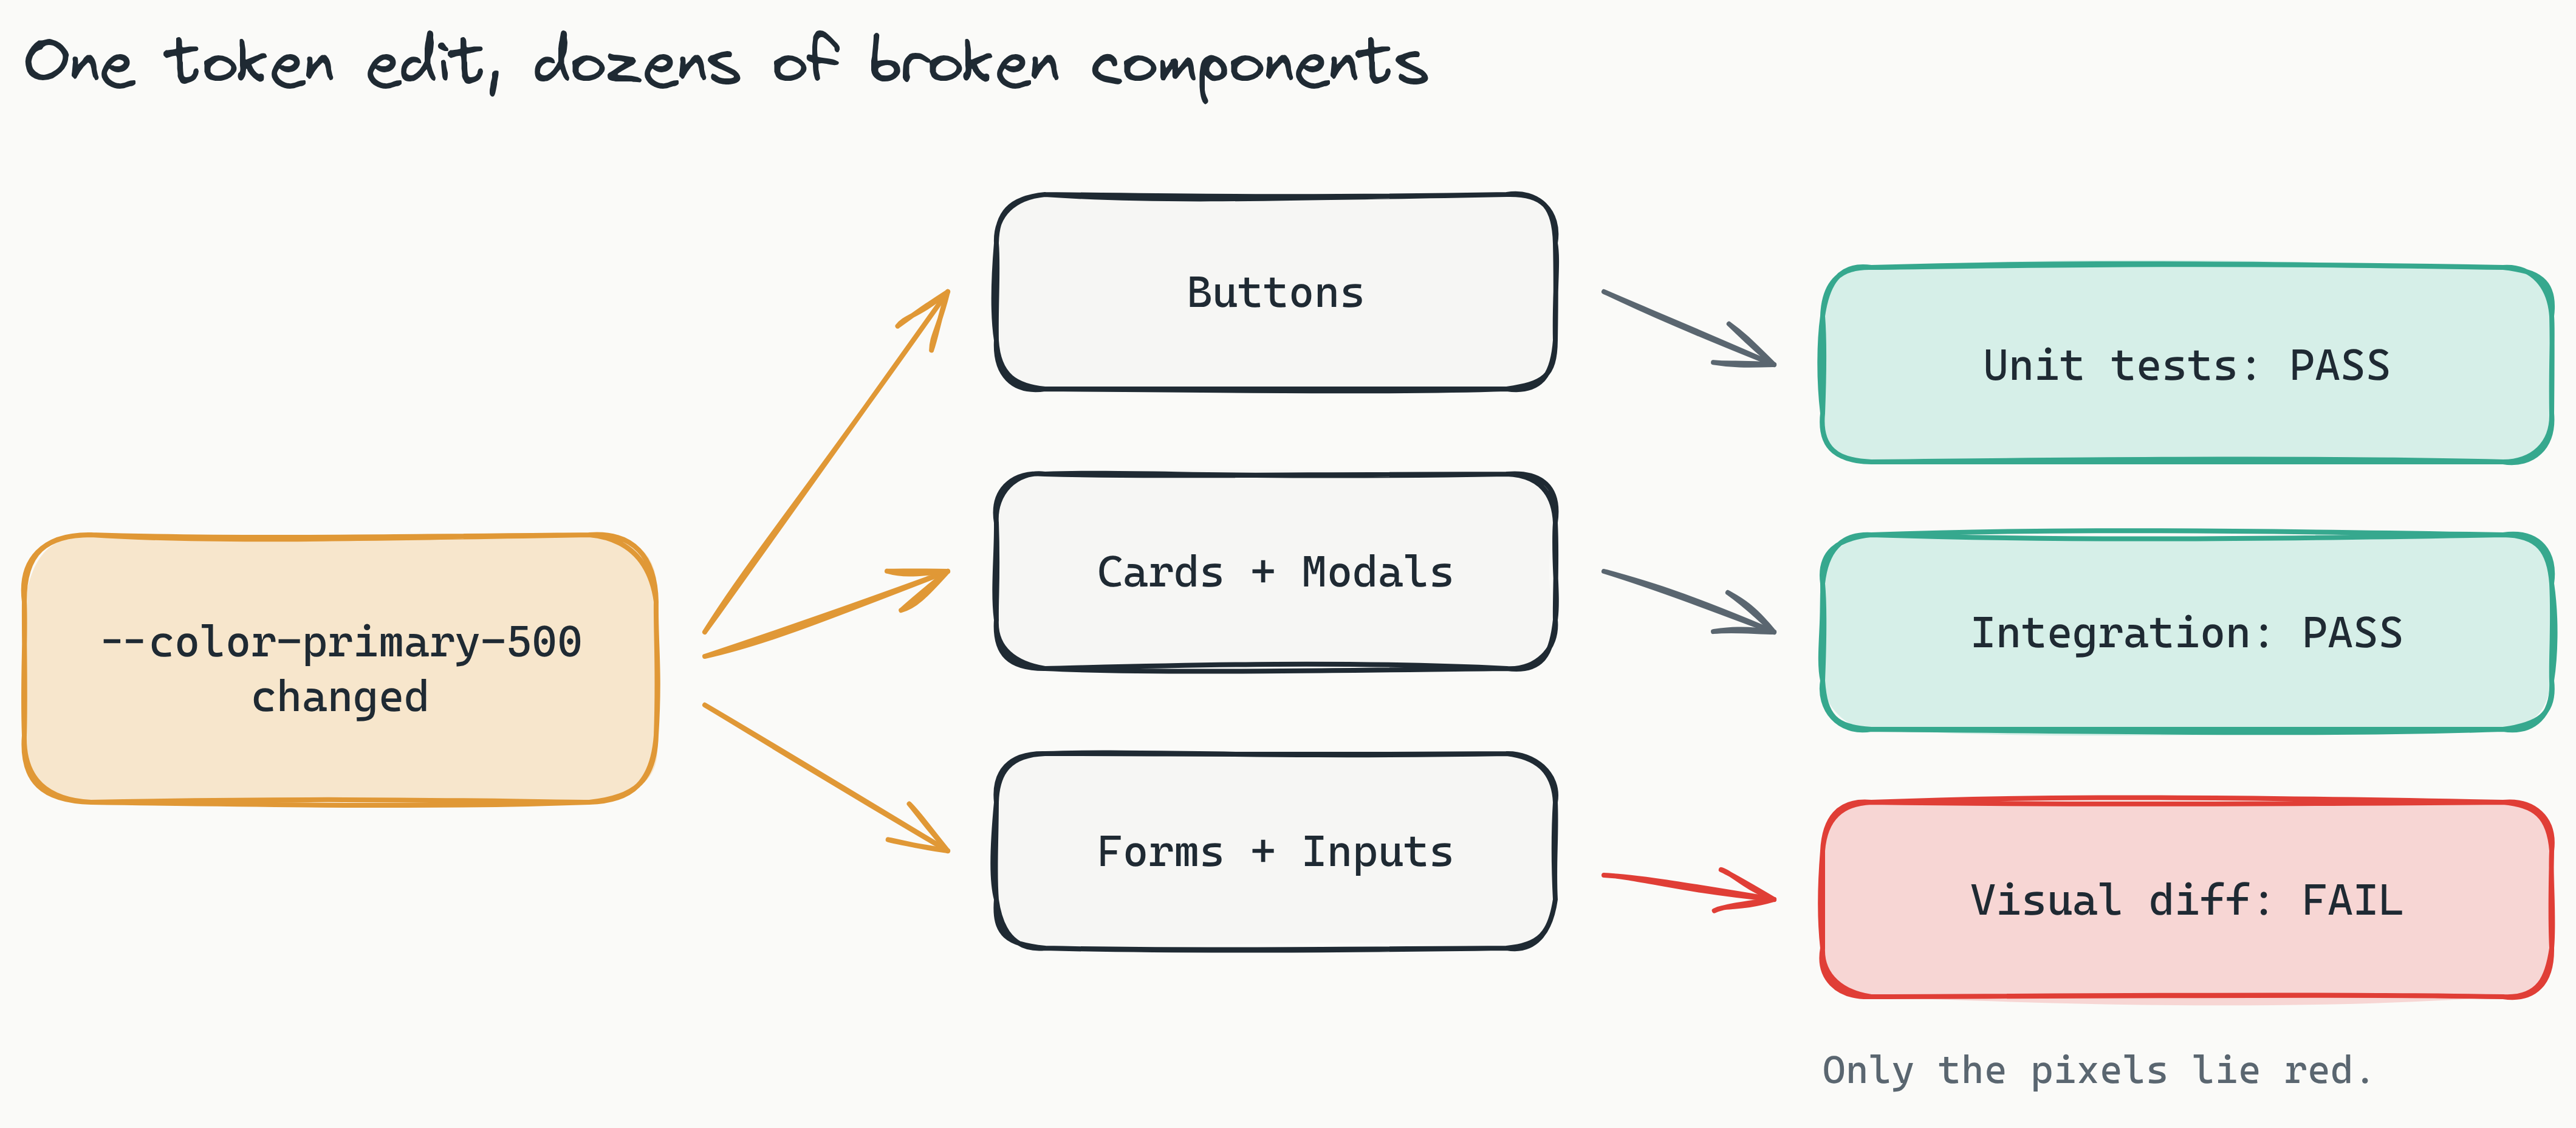
Traditional unit tests pass because the JavaScript logic is correct. Integration tests pass because the API calls succeed and the data flows correctly. Neither checks whether the button actually looks right. The visual layer remains untested.
The failure mode is depressingly common: a single CSS edit intended to improve form alignment adjusts a margin value, the change is logically sound, and it quietly breaks the layout of every form component across the product. No automated test catches it until the code reaches production. Visual regression testing is the one layer that catches what unit and integration tests miss: the visual integrity of the rendered interface.
Automated Visual Testing for UI Component Libraries: A Definition
Automated visual testing for UI component libraries captures screenshot baselines of individual components and compares them against new renders after every code change. When a change introduces a visual difference, the tool flags it with a diff overlay, and a human reviewer decides whether the change is intentional or a regression.
This differs fundamentally from unit testing, which validates logic, and integration testing, which validates interactions. Visual testing validates appearance: colors, spacing, typography, alignment, shadows, borders, and responsive behavior at every breakpoint.
Component-level visual testing focuses on the atomic units of a design system: individual buttons, cards, form fields, tooltips, badges, and their variants. Teams typically integrate visual tests with Storybook, rendering each component story in isolation and comparing it against the baseline. This granular approach ensures that every variant of every component remains visually correct after any upstream token change.
How to Test Design System Components Visually: A Step-by-Step Workflow
What is the workflow for visual regression testing in design systems? The process follows four steps: capture baseline screenshots of every component variant, run automated tests on every commit, review visual diffs in a human oversight dashboard, and approve or reject changes. AI-powered test generation can accelerate the workflow by authoring resilient Playwright tests and identifying edge cases automatically.
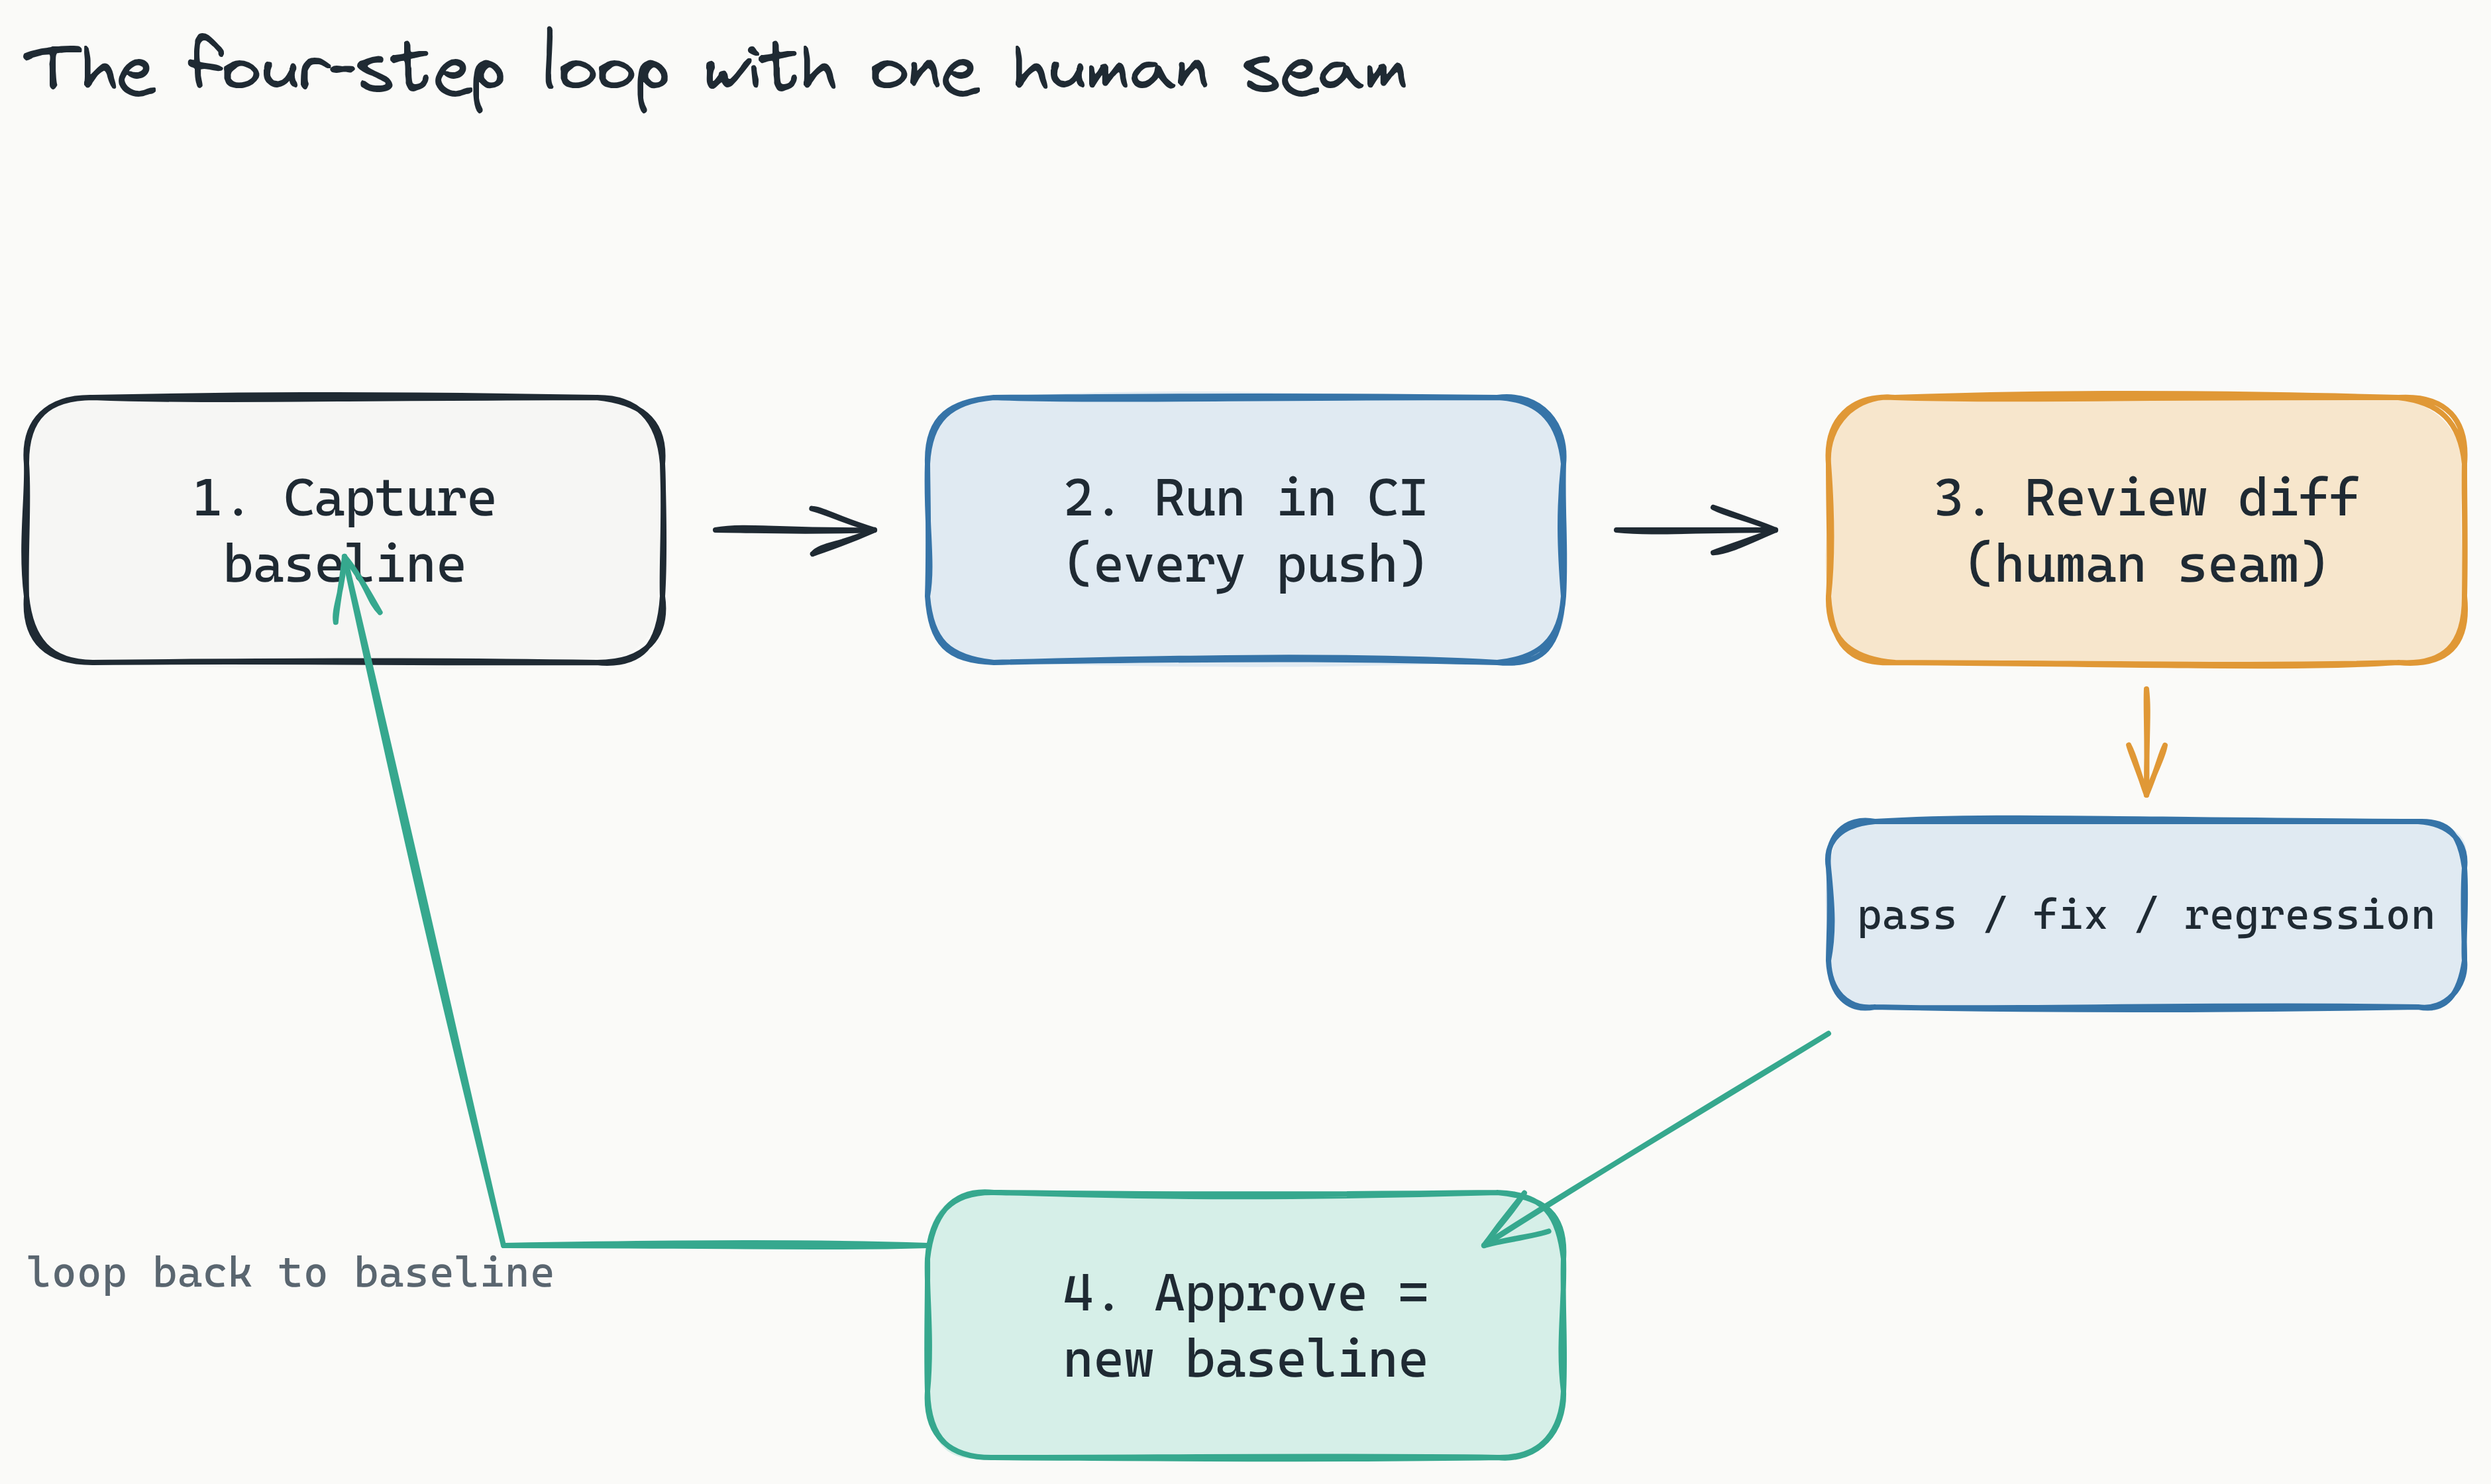
Step 1: Capture Baseline Screenshots
The first time you run visual tests, the tool captures screenshots of every component variant at specified breakpoints. These become your reference baseline. Every future test compares against this snapshot. Use a containerized browser to keep rendering consistent across local machines and CI runners, since font rendering and anti-aliasing vary between operating systems. Lastest ships an embedded browser pool (containerized Chromium) plus cross-OS stabilization (OCR-aware text diffing, font-loading waits, timestamp freezing) so screenshots stay deterministic without a local Playwright install.
Step 2: Run Automated Tests on Every Commit
Configure your CI pipeline to execute visual tests on every pull request or merge to main. The tool re-renders each component, takes a fresh screenshot, and compares it pixel by pixel (or structurally or perceptually) against the baseline.
Step 3: Review Diffs in a Human Oversight Dashboard
Not every visual difference is a regression. Intentional changes, like a deliberate color update or a spacing fix, appear as diffs but should be approved. A human reviewer examines each diff in a dashboard that overlays baseline and current renders, highlighting the changed regions. This is the one human seam in the loop: the reviewer renders exactly one of three verdicts (pass, fix, or regression), and the AI never approves its own output. This step prevents false positives from blocking deployments.
Step 4: Approve or Reject Changes
Approved diffs automatically update the baseline for future runs. Rejected diffs route to a code review to determine the root cause. Lastest also auto-classifies each failure as a real regression, flaky, environment, or test-maintenance issue with a confidence score, so the reviewer starts triage already sorted. This cycle, baseline then test then diff then verdict, becomes the heartbeat of design system maintenance.
AI-powered test generation accelerates this workflow by authoring resilient Playwright code and surfacing edge cases, state combinations, and responsive scenarios that might otherwise go untested. Lastest runs AI only when you create or fix a test; every replay after that is plain Playwright execution that costs zero tokens, so you can re-run the full suite thousands of times a day for nothing.
What's the Difference Between Pixel, Structural, and Perceptual Diffing?
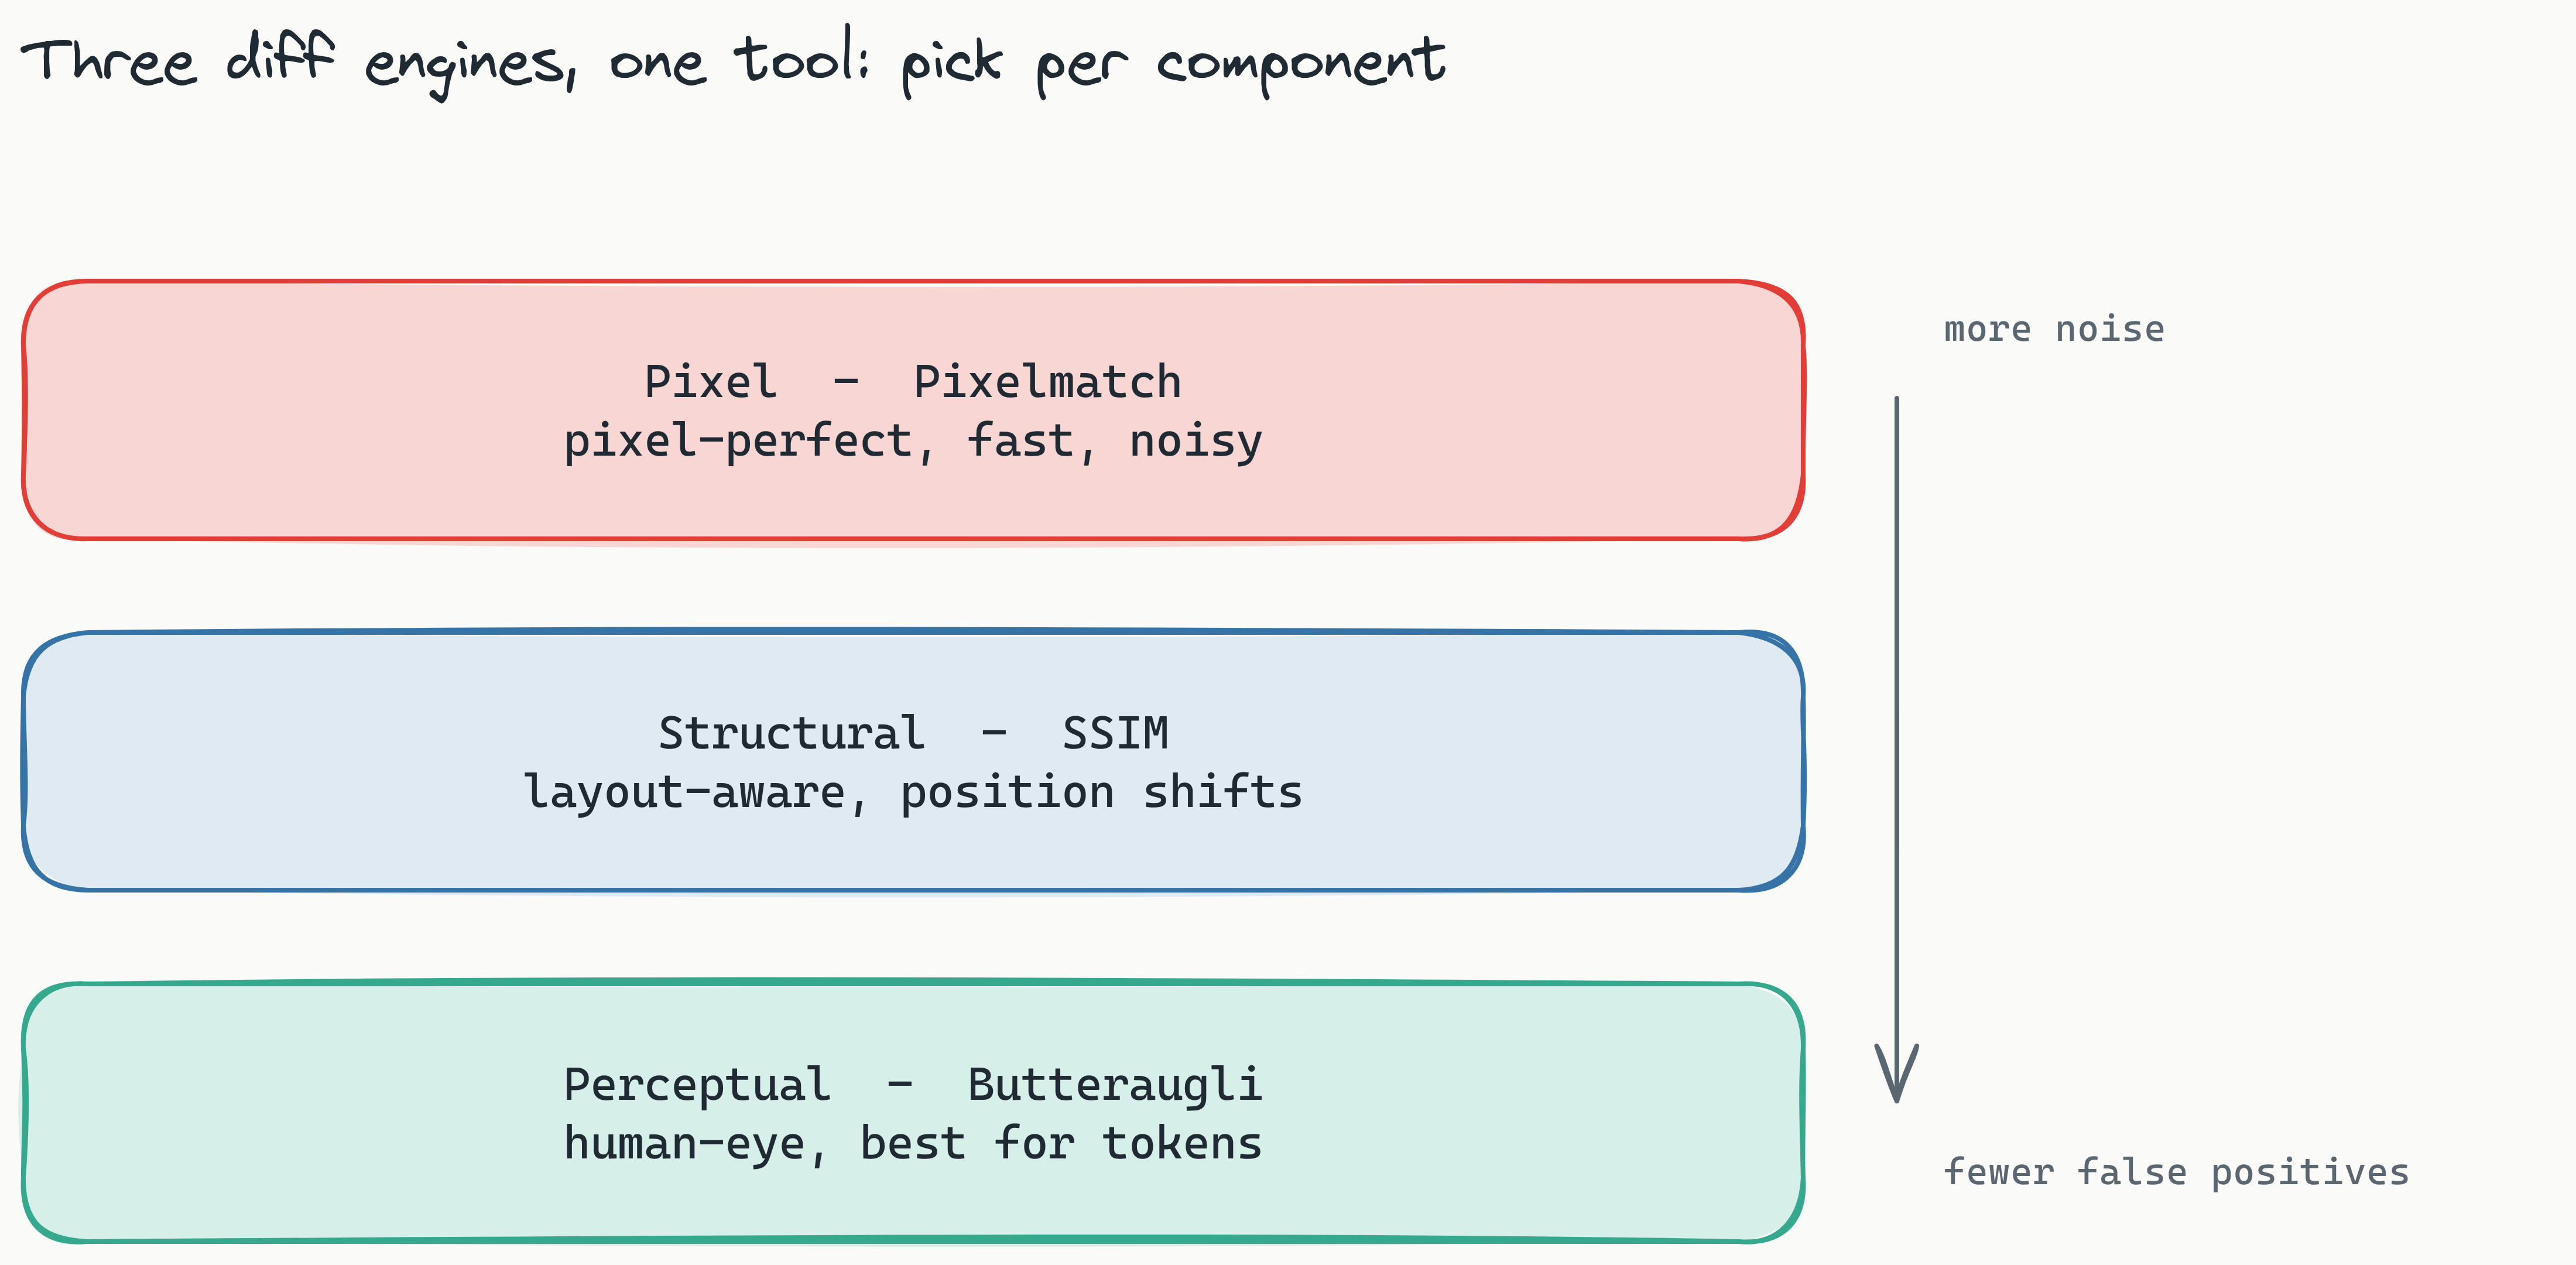
How do pixel, structural, and perceptual diffing compare? Pixel diffing (Pixelmatch) compares every pixel individually, catching every visual change but generating many false positives. Structural diffing (SSIM) analyzes layout and structure, catching position shifts but missing color or shadow changes. Perceptual diffing (Butteraugli) simulates human vision, ignoring sub-pixel artifacts while detecting meaningful visual regressions, making it the best balance for design systems.
Pixel Diffing (Pixelmatch)
Pixel-by-pixel comparison examines every individual pixel in the screenshot. It is the most granular approach but also the noisiest. Anti-aliasing differences between operating systems, slight font rendering variations, and sub-pixel positioning all trigger false positives. This approach works well for critical UI where every pixel matters, but it generates excessive noise in routine CI runs.
Structural Diffing (SSIM)
Structural comparison analyzes layout and structure, element positions, dimensions, and layout properties, rather than raw visual appearance. It catches layout shifts, missing elements, and reflow issues. However, it misses purely visual changes like color updates, shadow adjustments, or background image swaps. Use structural diffing for layout-heavy components where positioning is the primary concern.
Perceptual Diffing (Butteraugli)
Perceptual comparison simulates human vision by ignoring sub-pixel differences, anti-aliasing artifacts, and minor color variations that the human eye cannot detect. It produces fewer false positives while still catching meaningful visual regressions. This is the best balance for design systems, where token changes, color updates, and typography shifts need to be caught without flooding teams with noise.
False positives are the number-one reason teams abandon visual testing. Using perceptual diffing, or switching between engines per component type, sharply reduces that friction. We go deeper in how to reduce false positives in visual regression testing.
Percy vs. Applitools vs. Open Source: A Feature Comparison for Design Systems
| Feature | Percy | Applitools | Chromatic | Lastest |
|---|---|---|---|---|
| Starting price | from ~$199/mo | from ~$699/mo | from ~$179/mo | $0 self-hosted / $299/mo Cloud (flat) |
| Diff engines | Pixel only | Perceptual AI | Pixel + Structural | Pixel, Structural, Perceptual |
| Self-hosted option | No | No | No | Yes (free, FSL-1.1) |
| AI test generation | No | Limited | No | Yes |
| CI/CD integration | Git, GitHub, GitLab | Broad | Storybook-native | GitHub Actions, GitLab CI |
| Zero-token replays | No | No | No | Yes |
| Data sovereignty | Cloud-only | Cloud-only | Cloud-only | Self-hosted option |
Percy offers solid Storybook integration and a straightforward snapshot-based pricing model, but its per-snapshot billing generates cost pressure that teams with large component libraries feel quickly. For a 200-component design system with five variants each and three breakpoints, that is roughly 3,000 snapshots per baseline, and every commit runs against all of them.
Applitools provides powerful perceptual AI diffing that reduces false positives, but its entry point (starting around $699/mo) is prohibitive for smaller teams. It is cloud-only, meaning screenshots must leave your infrastructure.
Chromatic is tightly integrated with Storybook, but its diffing is more limited and, like the others, it is cloud-only with no self-hosting option for regulated environments.
Lastest differentiates itself by offering all three diff engines (Pixelmatch, SSIM, Butteraugli) in a single tool, with a free, open-source self-hosted version (FSL-1.1 license) that gives teams full data sovereignty and unlimited screenshots. For teams that prefer managed infrastructure, Lastest Cloud is a flat $299 per month, with no per-seat and no per-screenshot fees. AI-powered test generation runs only when you create or fix a test, and every replay after that costs zero tokens, which keeps the total cost of ownership flat no matter how often CI runs.
When comparing Percy vs Applitools for design systems, the decision often comes down to budget and diffing sophistication. See our detailed Lastest vs Percy vs Applitools and Chromatic vs Lastest breakdowns, plus our roundup of visual testing tools for design-system validation. An open source visual regression testing tool like Lastest bridges the gap by offering all three diff engines and AI test generation at no upfront cost.
How to Integrate Design System Visual Regression Testing into Your CI/CD Pipeline
Running visual regression tests in CI/CD requires a consistent rendering environment. A containerized browser is the de facto solution. Lastest runs Chromium in an embedded browser pool that produces identical screenshots regardless of the underlying CI runner, and ships a reusable GitHub Action plus GitLab MR comments so wiring it in is a few lines of YAML. Our CI/CD guide walks through the full setup.
Integrating design system visual regression testing CI/CD into your pipeline starts with tests that run on every pull request. Smart Run reads the git diff and executes only the tests your change actually touches, so a one-line token edit does not have to re-run all 3,000 component snapshots.
GitHub Actions Example
name: Visual Regression Tests
on: [pull_request]
jobs:
  visual-tests:
    runs-on: ubuntu-latest
    steps:
      - uses: actions/checkout@v4
      - name: Run Lastest visual tests
        uses: las-team/lastest-action@v1
        with:
          run: visual
GitLab CI Example
visual-tests:
  stage: test
  image: ghcr.io/las-team/lastest:latest
  script:
    - lastest run --visual
  only:
    - merge_requests
Zero-token replays mean AI runs only when you author or fix a test. Every replay after that, including every commit pushed to a feature branch, is plain Playwright execution that costs nothing in tokens. For teams running CI on every PR commit, this eliminates the per-snapshot billing that makes commercial tools expensive at scale; self-hosted screenshots are unlimited regardless of volume.
Branch baselines fork when a PR opens and merge back when it merges, so each feature branch maintains its own reference set without cross-branch interference or manual re-approval churn.
Visual Testing for Design System Tokens: Colors, Spacing, Typography, and Beyond
How does visual regression testing validate design tokens? Design tokens like color, spacing, and typography variables propagate across every component that references them. Visual regression testing automatically detects when a token update causes unintended visual changes across all affected components at multiple responsive breakpoints.
Design tokens are the atomic variables that define a design system's visual language: --color-primary-500, --spacing-md, --font-size-body, --shadow-card, --border-radius-sm. When a designer updates --color-primary-500 from blue to indigo, that change must propagate consistently across every component that references it.
Automated Design-Token Compliance Audits
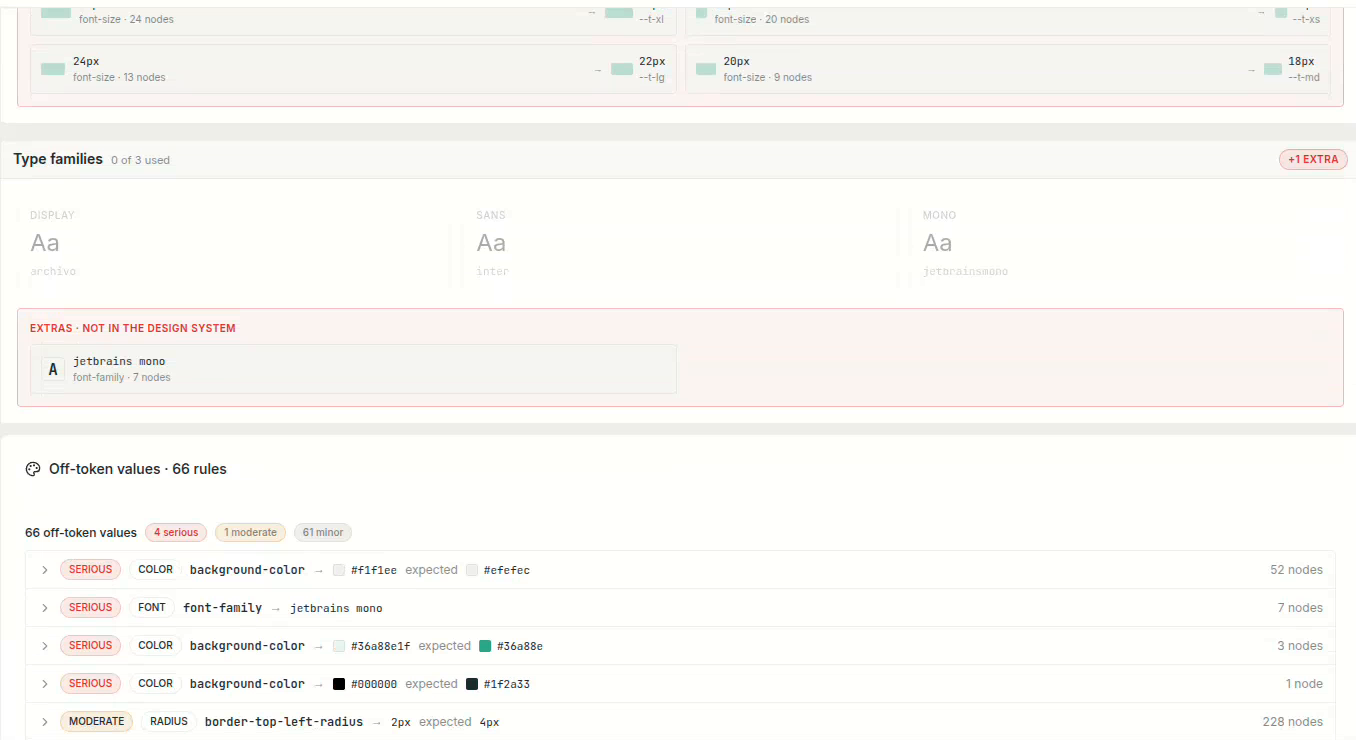
Manually auditing which components still respect your tokens is the kind of work that never gets done. Lastest automates it: on every run it walks every rendered node, reads its computed color, spacing, radius, and typography values, and maps each one back to the nearest token in your design system. Values that do not resolve to a token are flagged as off-token and graded by severity, so design-system drift shows up as a number you can watch instead of a slow, invisible erosion.
The score at the top is a running token-check tally. In this build, 11,914 of 12,093 checks pass, with 19 critical off-token values across 179 total. Each foundation gets its own section: the brand palette shows how many nodes use each brand color, the spacing scale shows which steps are actually in use (7 of 8), and corner radii and type families do the same. Anything outside the system is surfaced explicitly rather than silently tolerated.
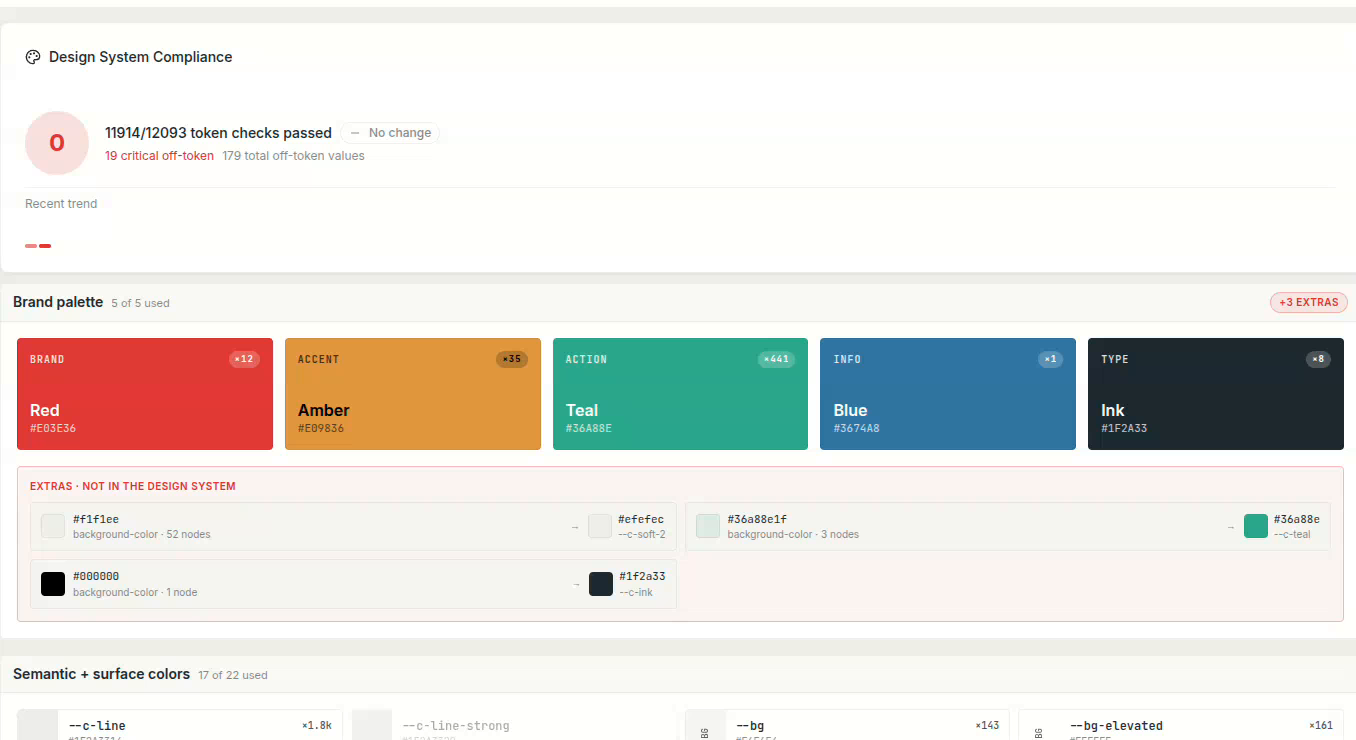
Every off-token value is listed with its severity, the property that drifted, the expected token, and the number of nodes affected, so triage is already sorted by blast radius. A font-size: 10px where the scale expects 12px across 146 nodes is a very different fix from a one-off 2px border radius, and the audit tells them apart. Wire this into the same run as your visual diffs and a token edit that quietly re-introduces an off-scale value is caught the moment it lands.
Visual testing for design system tokens catches token-level changes automatically. A perceptual (Butteraugli) diff will flag the color shift across all affected components without requiring engineers to manually audit each one. This is especially valuable for component state testing: hover states, active states, focus rings, disabled opacity, and error borders all depend on token references that may change upstream. Lastest also runs axe-core on every screenshot, scoring WCAG 2.2 AA from 0 to 100, so a token edit that quietly drops contrast below the accessibility threshold shows up the same build it lands.
Responsive breakpoints add another layer of complexity. A spacing token that looks correct at desktop width may cause overflow at mobile width. Testing tokens at multiple breakpoints, typically mobile (375px), tablet (768px), and desktop (1440px), ensures visual consistency across the full device spectrum.
Why Choose an Open Source Visual Regression Testing Tool in 2026?
Open-source testing tooling has moved from fringe to default as teams prioritize data sovereignty, predictable costs, and customizability over vendor lock-in.
Self-hosting is the primary driver. Regulated industries, finance, healthcare, and defense, cannot upload UI screenshots to third-party cloud services. An open source visual regression testing tool that runs entirely on your own infrastructure eliminates that compliance risk entirely; with Lastest, screenshots never leave your network.
Cost is the second factor. Commercial tools charge per snapshot or per seat, which becomes expensive at scale. A 200-component design system running tests on every commit across multiple feature branches burns through snapshot quotas quickly. Open-source tools with zero-token replays offer predictable costs regardless of testing frequency.
Customizability is the third. Open-source code can be forked, modified, and extended to fit unique workflows. Teams can add custom diff thresholds, integrate with proprietary reporting dashboards, or drive the whole platform from a coding agent: Lastest ships an MCP server exposing roughly 20 tools so Cursor or Claude Code can author and run visual tests directly. You also bring your own AI provider (Claude, OpenAI, OpenRouter, or local Ollama models), so there is no lock-in on the model either.
Self-hosting Lastest is free forever and provides AI-powered test generation, all three diff engines, and unlimited test runs on your own hardware. Lastest Cloud is available for teams that prefer managed infrastructure at a flat $299 per month.
Frequently Asked Questions
What is visual regression testing for design systems?
Visual regression testing captures screenshots of UI components and compares them against baseline images after every code change. It detects unintended visual changes, like misaligned elements, incorrect colors, or broken layouts, that unit and integration tests miss.
How is visual regression testing different from screenshot testing?
Screenshot testing focuses on individual page-level captures, while visual regression testing for design systems targets components at their atomic level, including variants and states. Component-level testing ensures every variant of every component is verified, not just full page renders.
What tools work best with Storybook for visual testing?
Tools like Percy, Chromatic, and Lastest work with Storybook stories. Lastest provides the added benefit of three diff engines (Pixelmatch, SSIM, Butteraugli) and a free self-hosted option for teams that need data sovereignty.
How do you audit design tokens for compliance automatically?
An automated design-token audit walks every rendered node, reads its computed color, spacing, radius, and typography values, and maps each one back to the nearest token in your design system. Values that do not resolve to a token are flagged as off-token and ranked by severity and the number of nodes affected, turning slow, invisible design-system drift into a token-check score you can track on every build.
How often should visual regression tests run?
Visual tests should run on every pull request and every merge to the main branch. Running tests on every commit within a branch is ideal for catching regressions early, especially with tools offering zero-token replays that make frequent runs cost-effective.
Can visual regression testing catch CSS-only regressions?
Yes. Visual regression testing is the only automated method that reliably catches CSS-only regressions. A change to a single token or stylesheet that visually breaks components will be flagged by the diff engine, even if no JavaScript logic changes.
Can visual regression testing catch accessibility regressions?
Yes. Lastest runs axe-core on every screenshot and scores WCAG 2.2 AA from 0 to 100, so a token change that drops color contrast below the accessibility threshold is flagged in the same build it lands, before it reaches users. Pairing a design-token audit with automated contrast checks is a recognized 2026 testing strategy for design systems.
What is the difference between self-hosted and cloud visual testing tools?
Self-hosted tools run on your own infrastructure, giving you full data sovereignty and predictable costs. Cloud tools are managed by the vendor but require sending screenshots to external servers, which may conflict with compliance requirements in regulated industries.
Get Started Testing Your Design System
Visual regression testing for design systems is the missing safety net that catches what unit and integration tests cannot: the visual breakages that cascade from token changes, component updates, and responsive adjustments.
Start by capturing baselines of your core components. Wire visual tests into your CI pipeline with the GitHub Action. Pick a tool that matches your team's scale, budget, and data sovereignty requirements. For teams that value openness and flexibility, Lastest gives you AI test generation, all three diff engines, WCAG 2.2 AA scoring, and zero-token replays.
Two ways to start. Self-host Lastest for free, forever on your own infrastructure (FSL-1.1, unlimited screenshots), or skip the ops and try Lastest Cloud at a flat $299 per month. Browse the live demos, read the docs, or grab the source on GitHub and start catching design-system regressions before your users do.