
Design systems grow fast. What starts as a handful of buttons and cards quickly becomes hundreds of components, each with multiple states, breakpoints, and theme variants. A single spacing token update can cascade across dozens of components, breaking layouts in ways no manual review could catch. This is the hidden cost of scaling UI, and it is exactly why visual testing tools for design system validation have become essential infrastructure for modern engineering teams.
This guide walks through what to look for in a design system validation tool, compares the leading options including Percy, Applitools, and Lastest, and shows how to wire visual testing into your CI/CD pipeline without paying per screenshot. Whether you are a solo founder building your first component library or a platform lead managing a multi-team design system, the goal is the same: catch the regression in the pull request, not in production.
Why Design Systems Need Visual Testing Tools
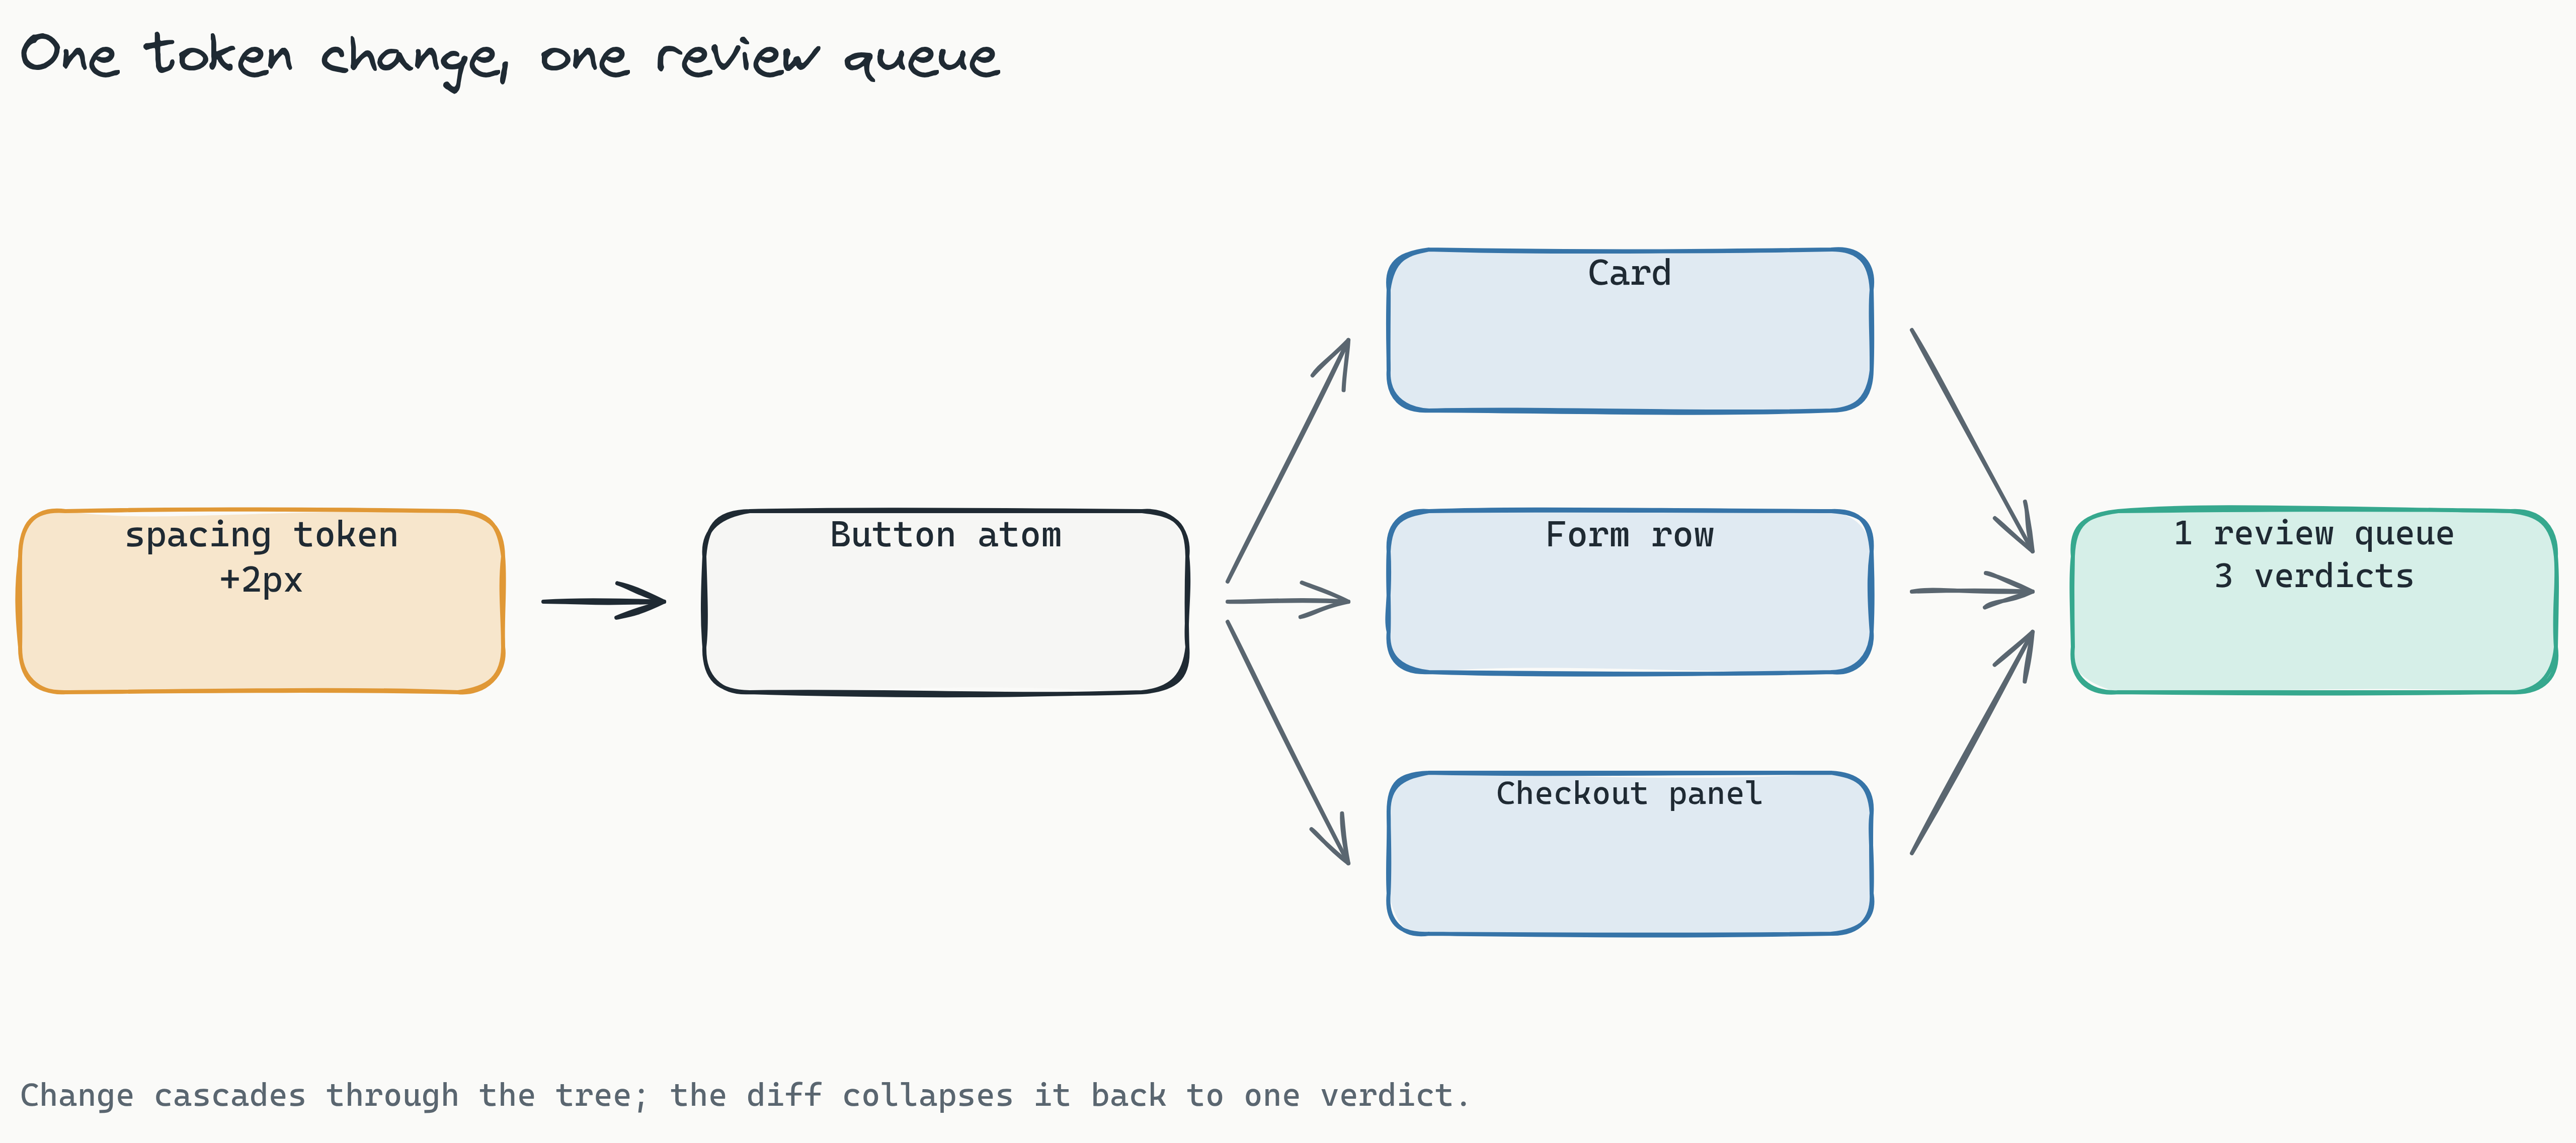
The core problem with design systems is their interconnected nature. Change one token - say, a border-radius value - and suddenly every card, button, input field, and badge component renders differently. Some changes are intentional. Others are regressions that slip through code review because the reviewer can't mentally simulate how every component state will appear across viewports and themes.
Manual visual review breaks down at scale for three reasons. First, the volume of component states grows combinatorially. A component library with 50 components and 5 states each produces 250 screenshots to eyeball per pull request. Second, human reviewers fatigue: attention drops sharply once a review queue runs into the dozens, and the boring near-identical diffs are exactly the ones people start rubber-stamping. Third, design token changes introduce "silent regressions" that pass functional tests but break visual alignment, because nothing in your unit suite asserts that a card is still aligned to the grid.
The real-world cost is harder to pin to a single number, but the shape is familiar to anyone who ships UI. A misaligned checkout button that quietly costs conversions is a bug that code review alone cannot prevent, and every hotfix shipped to undo a visual regression is engineering time you did not budget. The point of automated visual testing is to move that work upstream, into the diff, where it is cheap to catch.
Visual testing tools for design system validation solve this by automating the comparison of rendered components against baselines, flagging only meaningful differences for human review. They shift the burden from manual visual inspection to automated diffing, catching regressions before they reach production.
What to Look for in a Design System Validation Tool
Choosing the right tool requires evaluating several dimensions that go beyond simple screenshot comparison. Here's what matters most.
The Core Feature: Design System Visual Regression Testing
Design system visual regression testing differs from generic visual testing in one critical way: it must understand component relationships. A button change should not just flag the button itself, it should also flag every composite component that uses that button. The tool needs to track dependencies across your component tree, detecting when a change in one atom affects dozens of molecules and organisms. (We go deeper on this in visual regression testing for design systems.)
Look for tools that support component-level diffing with dependency awareness. Some tools achieve this through Storybook integration, capturing each component story as an isolated test case. Others use AI to infer component boundaries from your rendered output. The best approach combines both methods, giving you fine-grained control over which components to test and how changes cascade.
The cascade also makes review noisy: when one token change fans out across dozens of components, every diff lights up at once and the reviewer has to hunt for the region that actually moved. Lastest's show-area filter scopes both the comparison and the reviewer's attention to the region or component that changed, and page-shift detection avoids flagging the whole screen when a single element nudges everything below it. So a border-radius edit shows you the corner that changed on each affected card, not a wall of full-screen red.
Diffing Engine Quality
Not all visual differences are bugs. Anti-aliasing, sub-pixel rendering, and font hinting can produce false positives in pixel-based diffing tools. This is where engine quality matters.
It also matters that this is pixel verification, not a functional assertion. A unit test's expect() is binary - it passes or fails and ignores appearance entirely, so a card that renders two tokens off-grid but still mounts will sail through. Lastest instead classifies each captured screenshot as unchanged, flaky, or changed against configurable pixel and percentage thresholds, using whichever of its three engines you point at the component. That is the difference between asserting a component exists and verifying it still looks right.
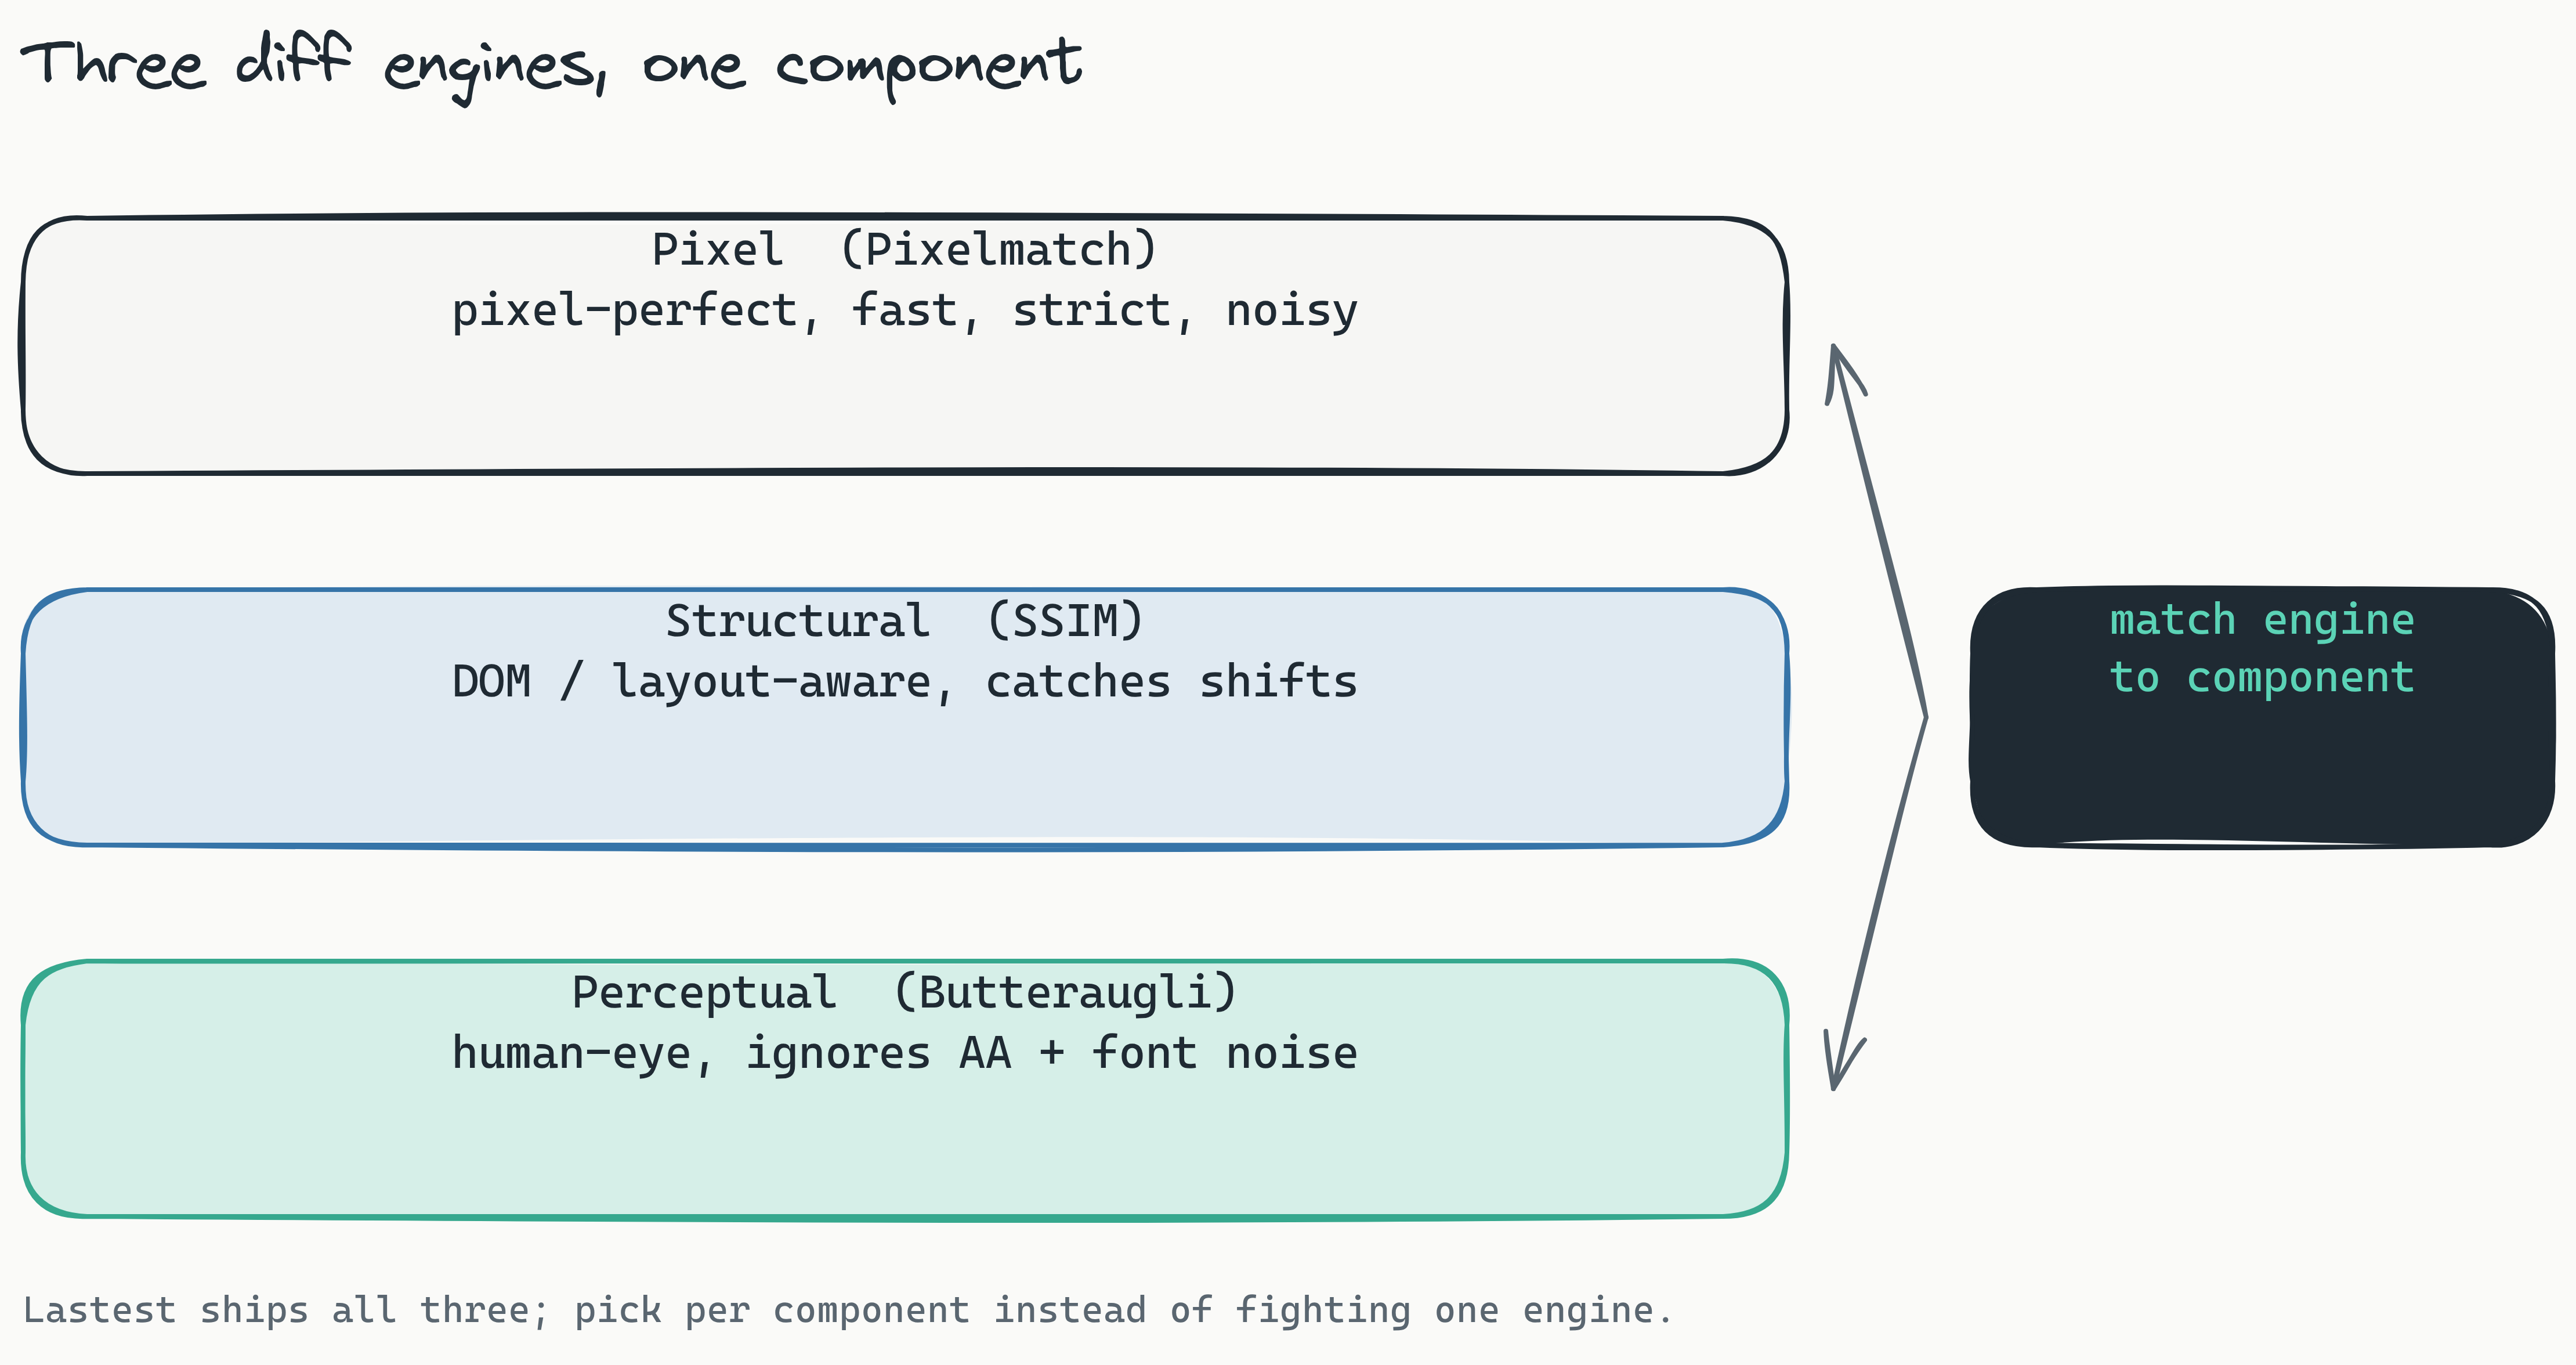
There are three families of diff engine, and Lastest ships all three so you can match the engine to the component:
- Pixel (Pixelmatch) compares images pixel-by-pixel. Fast and strict, but prone to false positives from rendering artifacts.
- Structural (SSIM) is DOM and layout aware. It catches layout shifts that pixel diffing over-flags and ignores some visual-only changes, so it is good for layout-heavy components.
- Perceptual (Butteraugli) is aligned with the human eye. It ignores anti-aliasing and font-rendering noise while still catching real regressions, which makes it the best default for noise-prone, icon-heavy components.
Tools that offer multiple engine types give you flexibility. You might run structural diffing on layout-heavy components and perceptual diffing on icon-heavy ones. The ability to choose the right engine per test case is one of the most effective levers for reducing false positives in visual regression testing.
Integration Depth
Your visual testing tool should fit into existing workflows without friction. Key integrations include:
- Storybook: the de facto standard for component documentation and isolated testing.
- CI/CD pipelines: a reusable GitHub Action, GitLab MR comments (self-hosted GitLab included), webhook triggers, and scheduled cron runs.
- Version control: PR commenting, status checks, and diff overlays. Lastest forks a branch baseline when a PR opens and merges it back on merge, so feature branches do not pollute your main baseline.
Also consider how the tool handles test discovery. Some require explicit test definitions. Lastest leans the other way: point it at a URL, an OpenAPI spec, or a markdown PRD, and AI authors resilient Playwright tests for you, with Route Discovery scanning source for paths the spec missed. That auto-discovery is what keeps setup overhead low on a large library.
Visual Component Library Testing in CI/CD
Integrating CI/CD visual testing for component libraries is now table stakes for mature development teams. The goal is simple: catch visual regressions before they merge, not after they deploy.
The ideal workflow follows this pattern:
- A developer opens a pull request with component changes
- CI triggers visual tests against all affected components and their dependents
- The tool captures new screenshots and compares them against baseline images
- Diffs are presented in a dashboard for human review
- The reviewer approves or rejects changes, updating baselines as needed
- The PR status check passes or fails based on diff verdicts
For GitHub Actions specifically, the setup is straightforward. You configure a workflow that checks out your repository, installs dependencies, builds your Storybook, and runs visual tests. The tool then uploads results and comments on your PR with a visual diff summary.
Key considerations for CI integration:
- Parallel execution: fan tests out across workers (Lastest uses an embedded, containerized Chromium pool plus distributed Remote Runners) to keep build times low.
- Baseline management: automatic baseline updates on
mainmerges prevent stale comparisons; every edit, AI fix, and restore is versioned with a reason. - Run only what changed: Smart Run reads the git diff and runs only the tests your change actually touches, instead of re-screenshotting the whole library on every commit.
A common pitfall is testing every component on every commit. Smart Run is the better default: it scopes the run to components whose dependencies changed, so you spend CI minutes on the surface that moved rather than the surface that did not, while still catching the regressions that matter. Pre-merge checks catch regressions early, and scheduled cron runs serve as a safety net for anything that slips through.
Handling false positives in automated pipelines requires a balanced approach. Lean on perceptual diffing for noise-prone components, and let AI failure classification triage the queue: every failure is auto-labelled as a real regression, flaky, environment, or test-maintenance issue, with a confidence score and reasoning, so reviewers open the real regressions first. See the CI/CD visual testing guide for the full pipeline.
Open Source vs. Proprietary: Which Is Right for Your Team?
The decision between open source and proprietary visual testing tools affects cost, control, and compliance. Here's how to evaluate both.
Open source advantages:
- Full data sovereignty: screenshots never leave your network.
- No per-screenshot or per-seat pricing. Self-hosted screenshots and replays are unlimited regardless of volume.
- Customizable: you can modify the diffing engine or build custom integrations, and bring your own AI provider (Claude CLI, Anthropic API, OpenRouter, OpenAI, or local Ollama) with no lock-in.
- Auditability: the entire codebase is inspectable for security review. Lastest ships under an FSL-1.1-ALv2 license on GitHub.
Proprietary (managed cloud) advantages:
- Managed infrastructure: no server maintenance or scaling to own.
- Faster onboarding, since there is nothing to provision.
- Dedicated support and SLAs.
For teams that prioritize data residency, self-hosted visual regression testing for design systems like Lastest is the clear choice: screenshots stay inside your network and the source is fully inspectable, which is the simplest way to satisfy a security review.
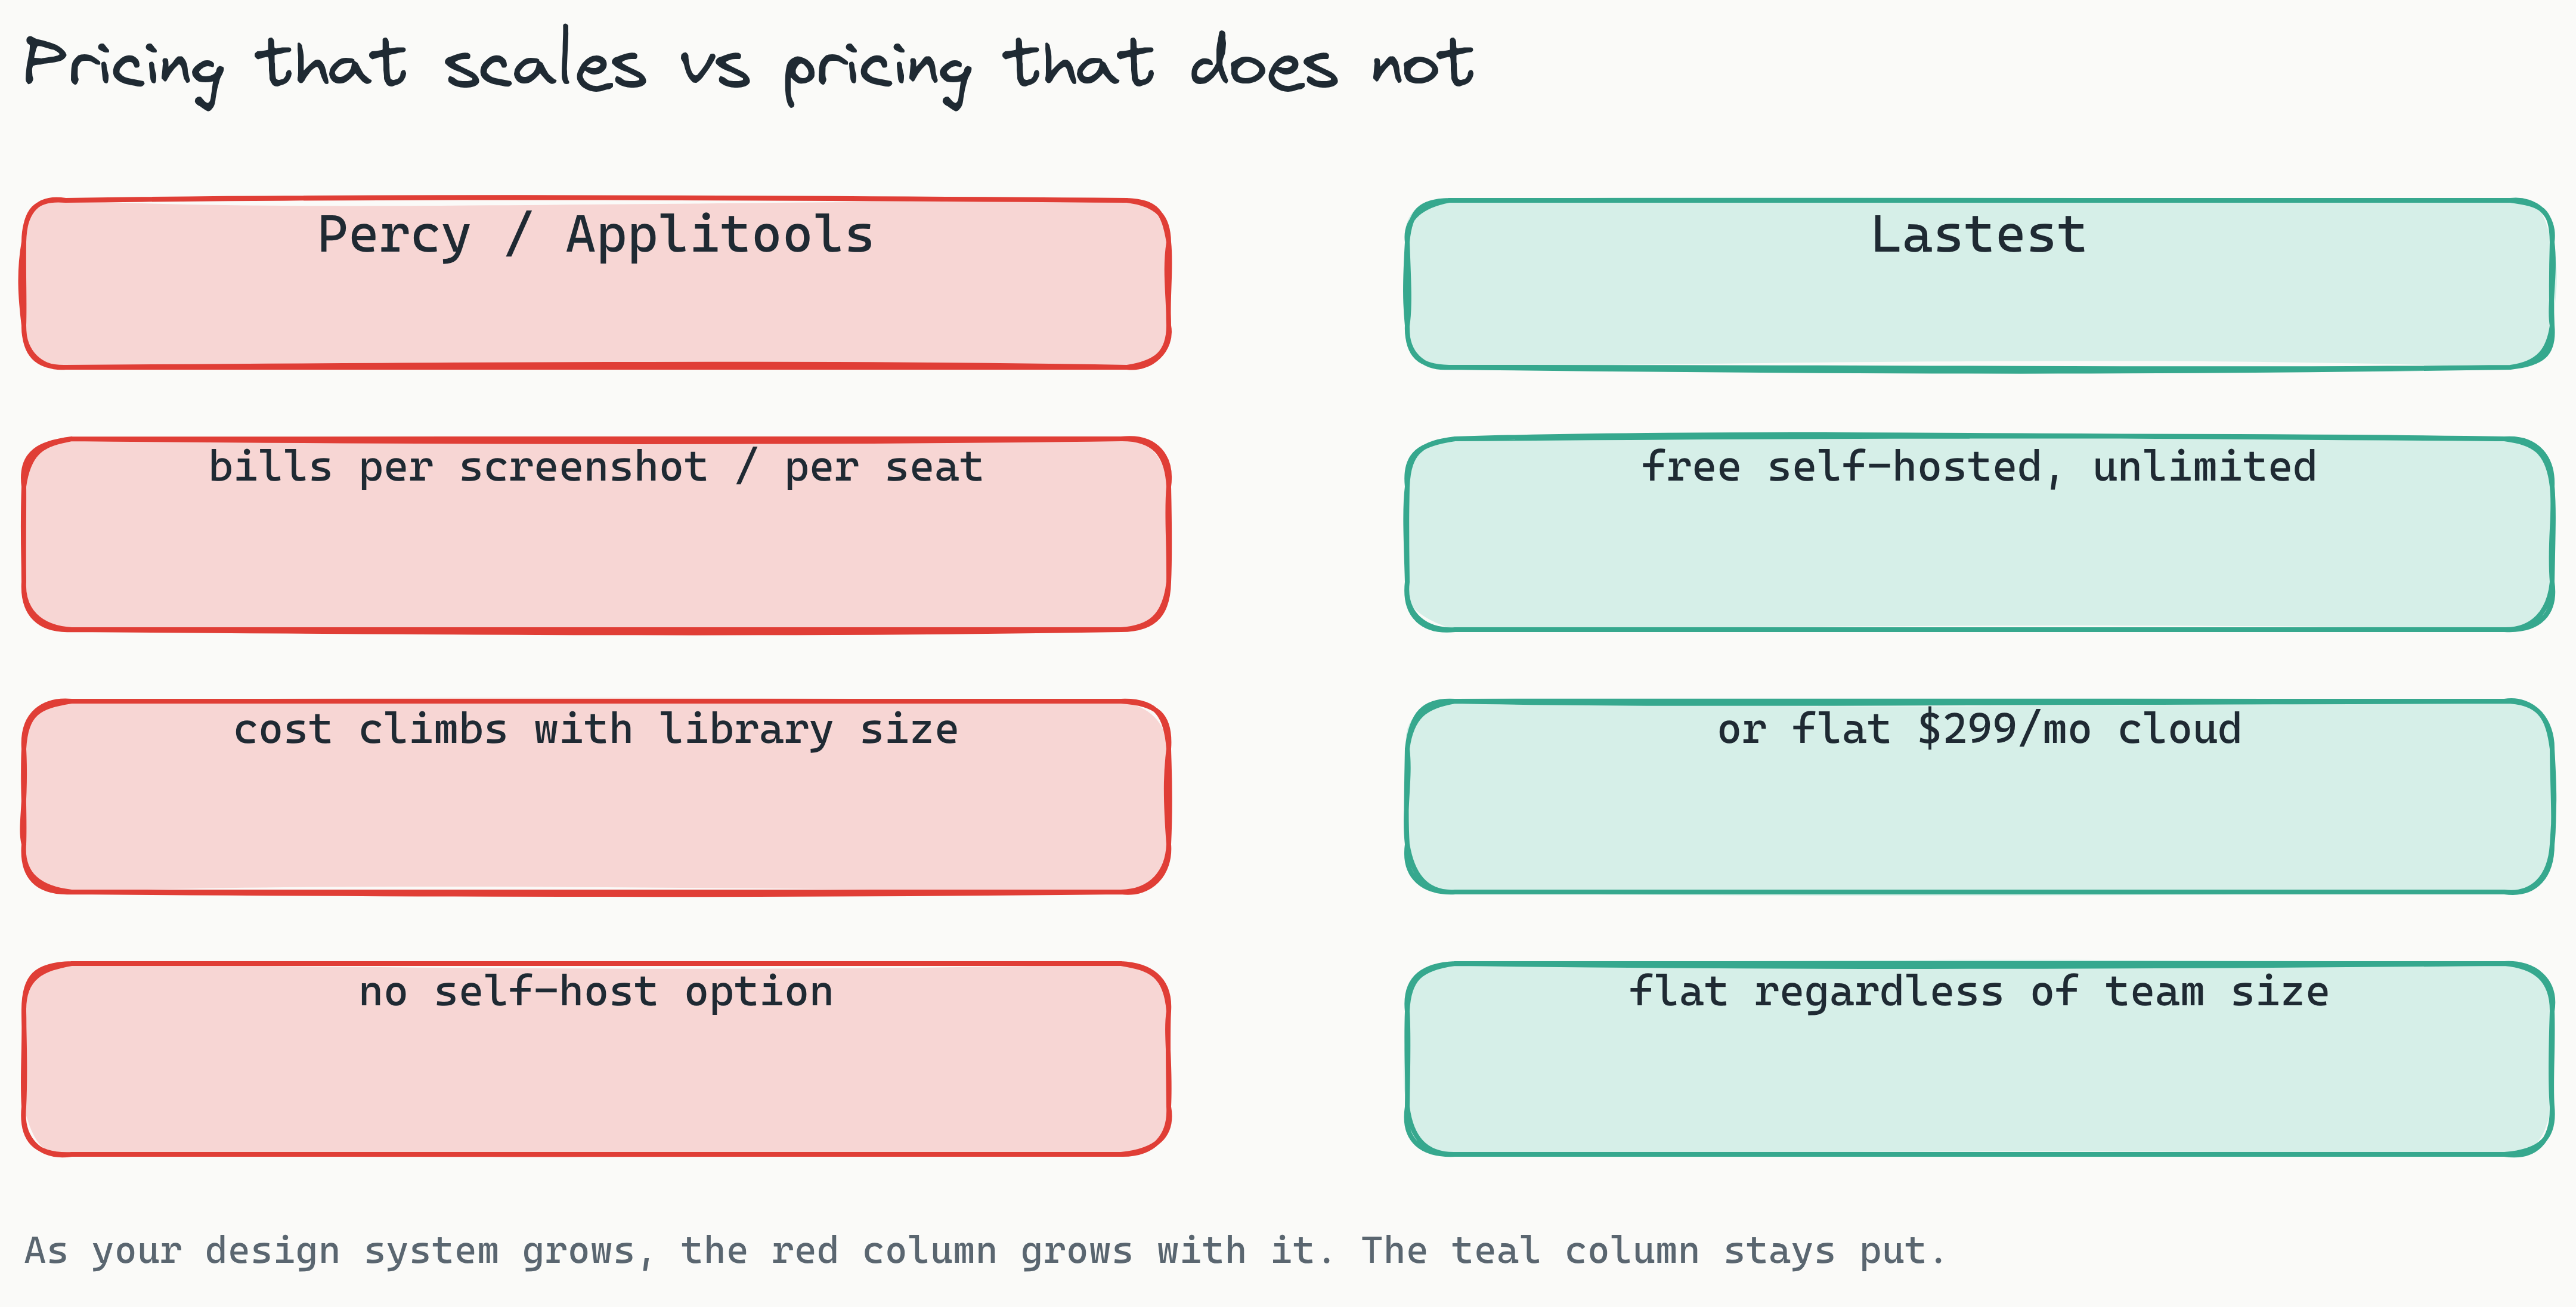
Cost is where the models diverge most. Proprietary tools generally bill per screenshot or per seat, so cost climbs with the size of your library and your team. Self-hosted Lastest is free forever, with only your own server hosting to pay for. If you would rather not run ops, Lastest Cloud is a flat $299 per month with no per-user or per-screenshot fees, and a free evaluation tier with a monthly quota. The full breakdown lives on the features page.
The trade-off is operational overhead. Self-hosting means someone owns the server, updates, and scaling. Lastest reduces that burden with an embedded browser pool that provisions into k3d locally or your cluster in production, so there is no local Playwright install to manage. Weigh community maturity too: a vibrant project means faster fixes and more integrations.
Design System Visual Diff Tools Compared
Key Differences: Percy vs Applitools vs Lastest for Component Testing
Let's compare the three most relevant options for design system validation.
| Feature | Percy | Applitools | Lastest |
|---|---|---|---|
| Diffing Engines | 1 (pixel) | 1 (AI perceptual) | 3 (Pixelmatch, SSIM, Butteraugli) |
| Self-Hosted | No | No | Yes (open source, FSL-1.1) |
| Pricing | From ~$199/mo, per screenshot | From ~$699/mo, per test/check | Free self-hosted; $299/mo flat cloud |
| Storybook Integration | Yes | Yes | Yes |
| AI Test Generation | No | Limited | Yes (bring your own AI) |
| Zero-Token Replays | No | No | Yes |
| Human Oversight Dashboard | Limited | Yes | Yes |
Percy has a polished developer experience and strong Storybook integration. Its snapshot-based approach works well for small-to-medium libraries. However, single-engine pixel diffing means more false positives from rendering artifacts, and the lack of self-hosting limits options for compliance-sensitive teams.
Applitools offers strong AI-powered review with its Ultrafast Test Cloud, and its perceptual engine is good at ignoring unimportant visual noise. The trade-off is cost: pricing starts higher (industry references put it from roughly $699 per month) and scales with test volume, which gets expensive for large design systems.
Lastest differentiates with its three-engine architecture, letting teams match the diffing approach to each component. Its zero-token replays are the structural cost advantage: AI runs only when you create or fix a test, and every replay after that is plain Playwright execution. So you can run visual tests on every PR, thousands of times a day, for $0 in tokens. Self-hosted screenshots are unlimited regardless of volume, and the open-source version gives you full data control with no pricing constraints. For more depth, see the Lastest vs Percy vs Applitools comparison.
On total cost of ownership: Percy and Applitools both bill in ways that climb with screenshot volume or seat count, so an active design system pushes you up their pricing tiers. Lastest self-hosted is free forever (you pay only for your own server), and Lastest Cloud is a flat $299 per month no matter how many developers or screenshots you run. For a growing team, that flat line is the differentiator.
Validating Design Systems at Scale for Enterprise Teams
Enterprise teams face their own challenges when validating design systems: governance, compliance, and coordination across multiple squads. Design system quality assurance at this scale requires tools that support those demands without inventing a second source of truth.
Versioned history and audit trail. In regulated environments you need to know who approved a baseline change and why. Lastest versions every edit, AI fix, and restore with a reason attached, so the trail of how a baseline got to its current state is part of the product, not a bolted-on log. Self-hosting also means that history stays inside your own infrastructure.
Multi-version and branch baselines. A common enterprise scenario is maintaining two versions of a design system at once while migrating components. Lastest forks a branch baseline when a PR opens and merges it back on merge, so each branch (and each version) gets independent baselines and diff histories instead of one global baseline everyone fights over. You can also compose builds by cherry-picking specific test versions.
Accessibility as a first-class check. Design system validation is not only about pixels. Lastest runs axe-core on every screenshot and produces a WCAG 2.2 AA score from 0 to 100, with severity-weighted deductions and per-build trend sparklines, so accessibility regressions surface in the same review as visual ones.
The human oversight dashboard is where enterprise value crystallizes. Lastest keeps exactly one human review seam: a reviewer renders one of three verdicts (pass, fix, or regression), and AI never approves its own output. That shared interface lets QA managers, design leads, and accessibility specialists review diffs together, breaking the silo between design and engineering instead of pushing all review onto developers. For agent-driven workflows, an MCP server exposes roughly 20 tools so coding agents like Cursor or Claude Code can drive Lastest directly.
Getting Started: Validate Your First Component Library with Lastest
Ready to validate a UI component library with visual testing? Here is the shape of the process with Lastest. You can run it three ways, depending on how much autonomy you want: AI-Free recording (air-gapped, no API keys), AI-Assisted (AI proposes, a human reviews every change), or Full Autonomous with the Play Agent.
Step 1: Point Lastest at your components
Give Lastest a source to work from: your Storybook or component URLs, an OpenAPI spec, or a markdown PRD describing the flows. AI authors resilient Playwright tests for each one, and Route Discovery scans your source for paths the spec missed. The embedded browser pool means there is no local Playwright install to set up; containerized Chromium provisions into k3d locally or your cluster in production.
Step 2: Capture the first baseline
The first run is where AI does its work, generating the tests and capturing baseline screenshots. The selectors it writes use a 7-layer fallback (data-testid, then id, role, aria-label, text, CSS, and finally OCR), so they survive the refactors that break hand-written selectors - exactly the churn a living design system produces when a component gets renamed or restructured. Lastest tracks a success rate per selector and exposes MCP live-page selector validation, so you can see which locators are drifting before they fail. This is the one place tokens are spent.
Step 3: Review diffs in the human oversight dashboard
Open the dashboard and you will see every component with baseline and current images side by side, live JPEG streaming from the browser pool. Before the comparison runs, animation freezing and 12 flaky-test guards (timestamp freezing, network-idle wait, DOM-stability, font-loading wait, burst capture, and cross-OS consistency among them) settle each component so an animated toast or a mid-load web font does not read as a regression - and cross-OS consistency keeps a snapshot captured on a developer's Mac from diffing against one rendered on a Linux CI runner. Diffs are then surfaced with the appropriate engine (Pixelmatch for strict comparisons, SSIM for layout changes, Butteraugli for visual-only regressions), and AI failure classification labels each one as a real regression, flaky, environment, or test-maintenance issue.
Step 4: Render a verdict
For each diff, the reviewer picks one of three verdicts: pass, fix, or regression. Approve intentional changes to update the baseline; flag regressions to block the merge. AI never approves its own output, so this single human seam is the only place a change becomes official.
Step 5: Wire it into CI/CD
Add the reusable Lastest GitHub Action (or GitLab MR comments, webhooks, or scheduled cron) to your pipeline. From here on, every run is a zero-token replay: plain Playwright execution with no further AI cost, regardless of how many commits your team pushes. That is what makes it economical to run visual tests on every PR, not just on merges to main. The docs have the full setup, and live demos show it running end to end.
Conclusion
Design system validation is not optional in 2026. The interconnected nature of component libraries means a single token change can cascade into dozens of visual regressions, regressions that manual review and functional tests cannot reliably catch. Visual testing tools for design system validation provide the automated infrastructure to catch these in the pull request, before they reach production.
The right tool depends on your team size, compliance needs, and budget. Percy and Applitools offer polished, managed experiences that bill per screenshot or per seat. Lastest offers three diff engines, AI-authored Playwright tests with self-healing selectors, a single human review seam, and zero-token replays, available free and self-hosted or as flat-rate Cloud. For teams that want maximum control with no recurring per-test cost, that combination is hard to beat. It is a good fit whether you are a small team of devs doing QA or shipping a React component library.
The fastest way to decide is to run it on your own components. Self-host Lastest for free (it is open source under FSL-1.1, with unlimited screenshots on your own infra), or skip the ops and start on Lastest Cloud at a flat $299 per month. Either way, the code is on GitHub at las-team/lastest. Point it at your Storybook, capture one baseline, and let the next token change tell you exactly which components it touched.