
Ever shipped a UI bug that made it all the way to production? That misaligned button. The broken layout that only appeared in Safari. The text overflow nobody spotted until a customer screenshotted it on Twitter. These issues share one thing in common: they were invisible to unit tests and integration tests, which only verify logic, not appearance.
The hidden cost of manual visual QA adds up fast. Teams burn hours clicking through pages before every release, yet regressions still slip through. Visual regression testing in CI/CD is the only scalable approach that catches these issues automatically, before they reach users. This guide walks through implementing visual regression testing in CI/CD: tool selection, pipeline integration, and practical steps that work for teams of any size. We use Lastest, a free, self-hosted, open-source platform, for the examples, but the patterns apply to any tool.
Why Visual Regression Testing Fails in Most CI Pipelines
Most visual regression testing efforts fail in CI because teams conflate snapshot testing with true visual regression testing, leading to brittle pipelines and false positives that erode trust in automation.
Snapshot testing - whether through Jest, Playwright's toMatchSnapshot, or similar tools - compares strings or serialized DOM output. It creates a text-based artifact and fails whenever that string changes, regardless of whether the change is visually meaningful. A single whitespace difference or a reordered CSS class triggers a failure. The output is a cryptic diff log, not a screenshot. Developers see a red CI check with zero context about what actually changed visually.
True visual regression testing compares rendered images. It produces side-by-side visual diffs that humans can actually review. It handles dynamic content through configurable tolerance thresholds. And when a test fails, the output is a visual diff - not a text log.
What's the difference between snapshot testing and visual regression testing?: Snapshot testing compares text-based outputs (strings or DOM) and produces a cryptic diff log when mismatches occur. Visual regression testing compares rendered screenshots, produces a side-by-side visual diff, handles dynamic content through configurable tolerance thresholds, and integrates human review into the CI workflow.
| Criteria | Snapshot Testing | Visual Regression Testing |
|---|---|---|
| Diff type | String (text) comparison | Image/pixel comparison |
| Output format | diff log | Side-by-side visual diff |
| Dynamic content | Fails on any change | Tolerates via threshold |
| CI failure behavior | Hard fail (no output) | Blocking diff + human review |
| Baseline management | Manual update | Dashboard-based approvals |
False positives destroy team trust in CI checks. When developers see repeated failures from snapshot tests that caught a version number change or a minified CSS reorder, they learn to ignore the check entirely. The fix: use tools with human-in-the-loop dashboards. With a single human review seam, a failing visual regression becomes a conversation, not a build-breaker. The reviewer renders one of three verdicts - pass, fix, or regression - approving the diff if intentional or flagging it if a regression slipped in. The AI never approves its own output. Trust returns when every failure has a human explanation attached. We dug into why this matters at scale in the human-in-the-loop verification seam.
The part the tutorials skip: filtering noise before it reaches a human
Here's the uncomfortable truth about the pipeline you are about to build. Standing up a generic CI/CD visual-testing job is easy - a Docker service, a screenshot step, a diff artifact, and a PR comment, all of which you can wire up in an afternoon. The hard part is what happens on day 30, when your suite has drowned in flaky false positives and the team has quietly muted the check. Every visual regression tool can produce a diff. The differentiator is what filters noise before it reaches a human reviewer, so the diffs that land on a PR are the ones worth looking at.
That noise filter is where Lastest is opinionated, and it is why we self-host our own examples on it. Four layers do the work: (1) three diff engines - Pixelmatch, SSIM, and Butteraugli - classify each screenshot as unchanged, flaky, or changed against configurable thresholds, instead of a single binary pass/fail gate that fails on one anti-aliased pixel; (2) twelve flaky-test guards plus animation freezing kill the timing and rendering jitter that generate most false diffs; (3) AI failure classification tags every remaining failure as a real regression, flaky, environment, or test-maintenance issue, so reviewers triage by category instead of scrolling; and (4) Smart Run reads your git diff and executes only the tests your change actually touches. We break down each of these guards in the false-positive reduction guide. Keep this seam in mind as you read the setup below - the YAML is the easy 20%; the noise filtering is the 80% that decides whether the pipeline survives.
Step-by-Step: Setting Up a Self-Hosted Visual Regression Pipeline with Docker
This section walks through setting up a self-hosted visual regression testing pipeline using Docker. The approach works for any web application and runs entirely on your infrastructure - no cloud dependency, no hidden costs.
Prerequisites: Docker installed on your development machine and CI runner, a GitHub repository with a web application, and basic familiarity with writing Playwright or Nightwatch tests.
Step 1: Configure docker-compose.yml
Create a docker-compose.yml file in your project root. This spins up the visual regression testing service alongside your application:
version: '3.8'
services:
  lastest:
    image: lasteam/lastest:latest
    ports:
      - "3000:3000"
    volumes:
      - ./visual-tests:/app/visual-tests
      - ./baselines:/app/baselines
    environment:
      - LASTEST_AUTH_TOKEN=${LASTEST_AUTH_TOKEN}
Run docker-compose up -d to start the service. Your visual regression testing instance is now running locally.
Step 2: Write Your First Visual Test
Create a test file that captures a screenshot of your application's homepage:
const { chromium } = require('playwright');
const { visualTest } = require('@lastest/sdk');

test('homepage renders correctly', async () => {
  const browser = await chromium.launch();
  const page = await browser.newPage();
  await page.goto('http://localhost:8080');
  await visualTest(page, 'homepage');
  await browser.close();
});
The visualTest function captures a screenshot and compares it against a stored baseline. If no baseline exists, it creates one.
Step 3: Generate the Baseline
Run the test locally. On the first execution, no baseline exists, so the tool creates one and marks the test as "pending approval." Open the Lastest dashboard at http://localhost:3000, review the screenshot, and approve it as the initial baseline. After this first run, zero tokens are consumed for replays.
Step 4: Add the CI Job
Configure your CI pipeline to trigger visual regression tests on every pull request. The pipeline starts the Docker service, runs the visual tests, uploads diff artifacts, and posts a link to the dashboard for human review.
How do you set up a self-hosted visual regression testing pipeline with Docker?: Start by creating a docker-compose.yml that spins up the visual regression service alongside your application. Write Playwright-based tests that capture screenshots, generate an initial baseline by approving the first screenshot in the dashboard, then configure a CI job that runs these tests, uploads diff artifacts, and posts a review link on every pull request. After the first run, subsequent replays consume zero tokens.
Why Self-Host?
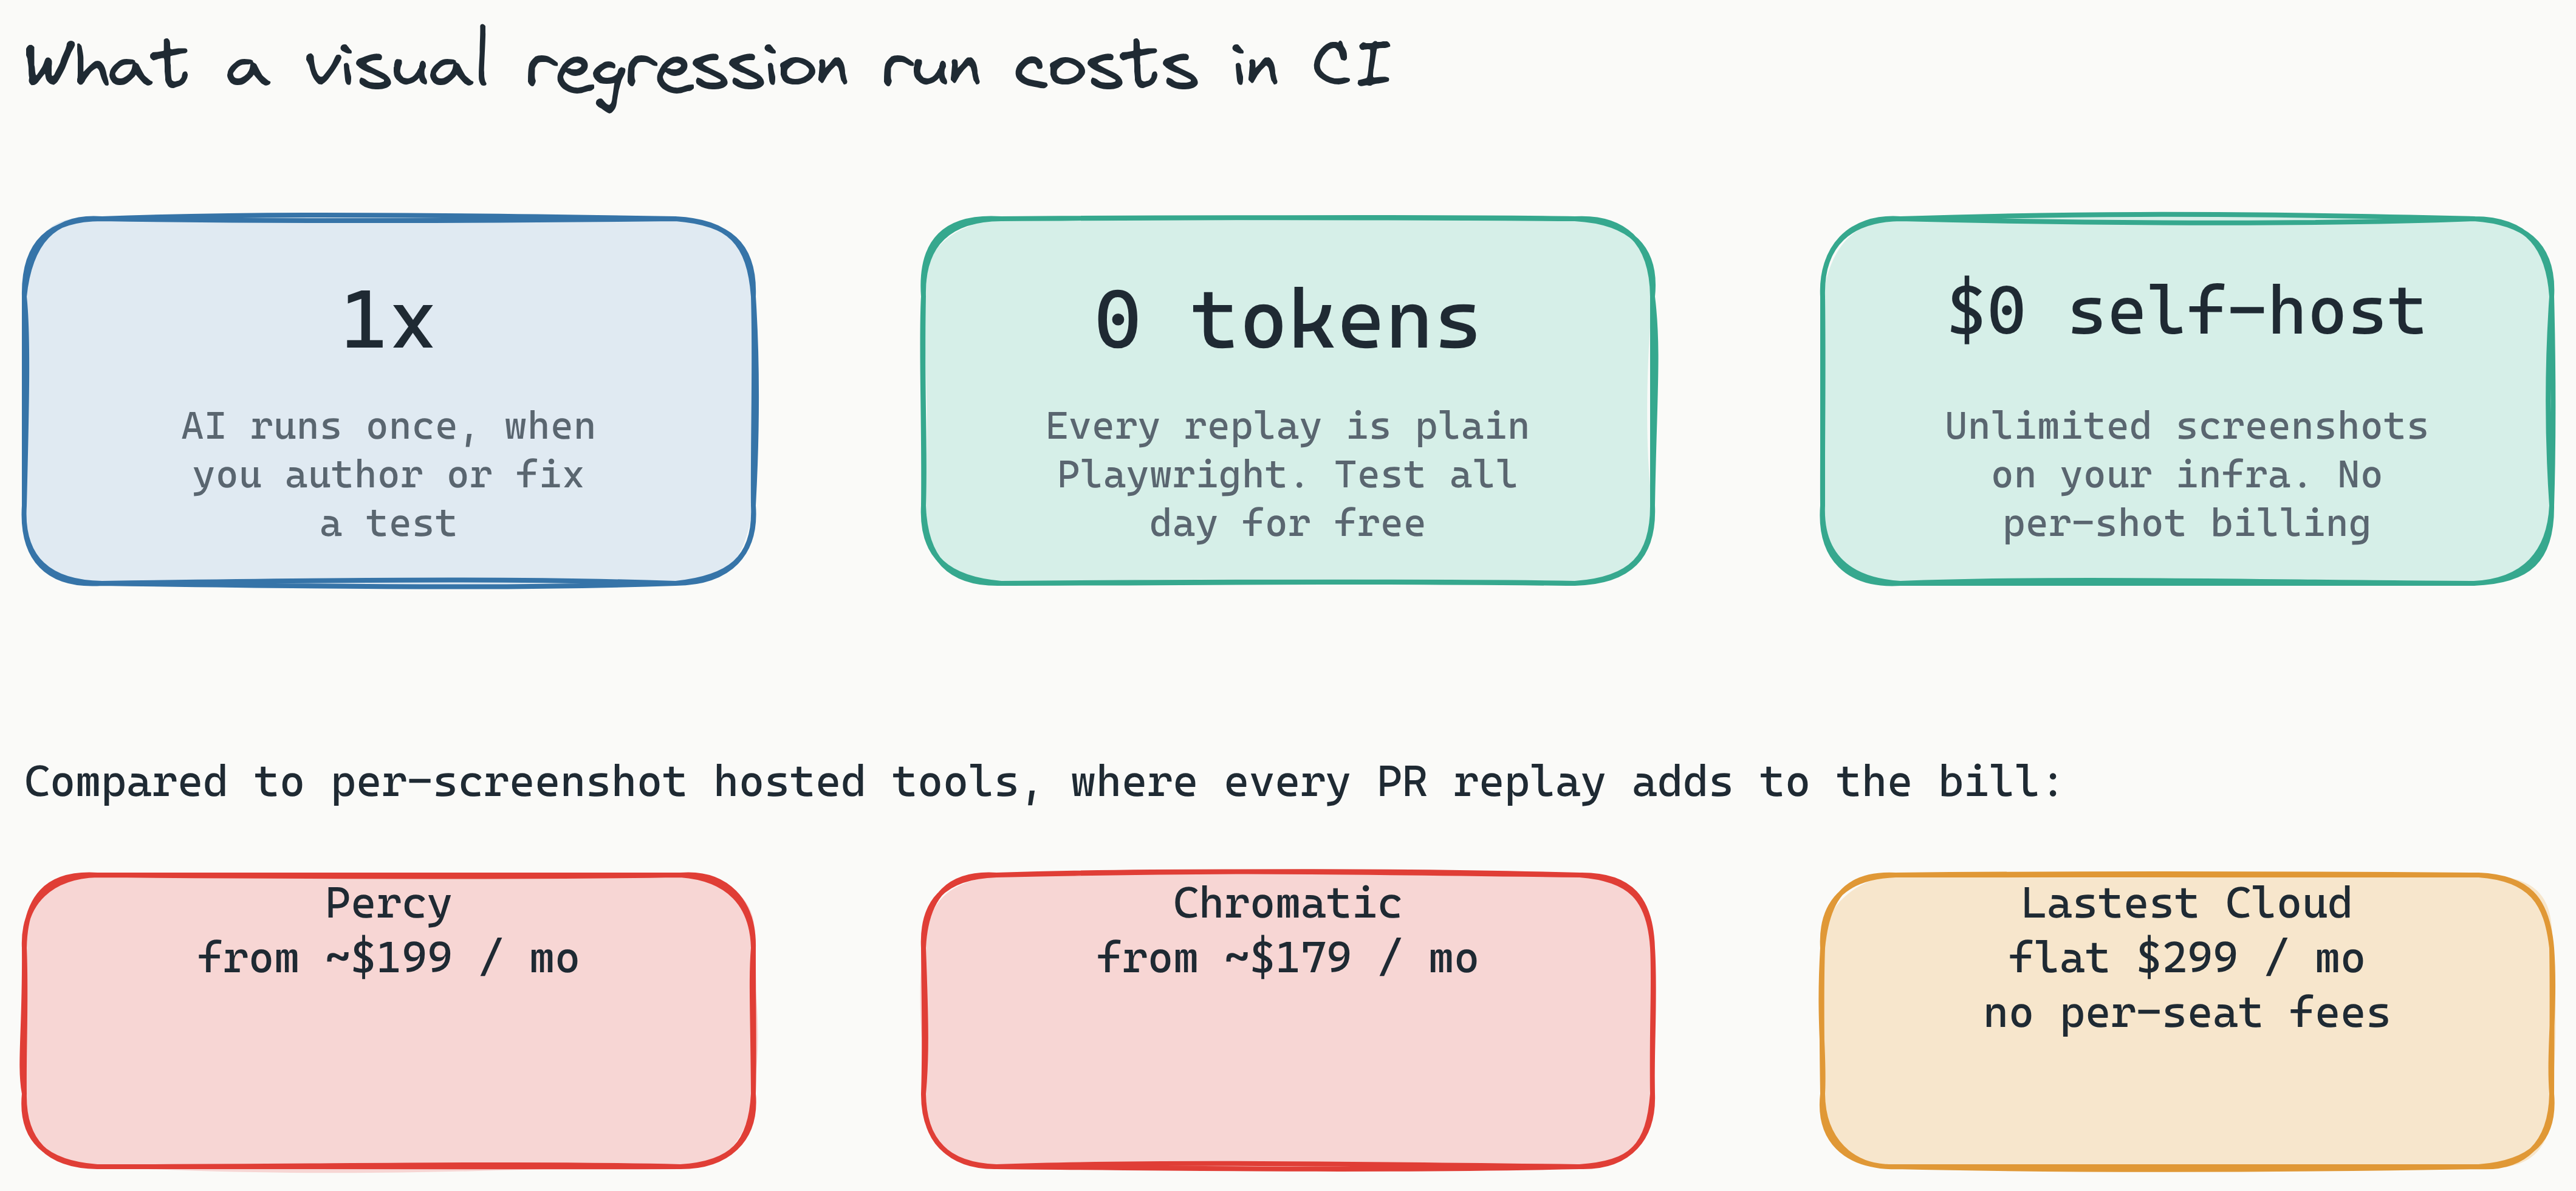
- Cost savings: Lastest's self-hosted version is free forever (FSL-1.1-ALv2 open source), unlike Percy (from ~$199/mo) or Chromatic (from ~$179/mo), which bill per screenshot or per seat. If you want managed infra, Lastest Cloud is a flat $299/month with no per-seat or per-screenshot fees.
- Data compliance: All visual data stays within your infrastructure. No screenshots of internal dashboards or customer portals leave your VPC.
- Full control: You control deployment, updates, and configuration. No dependency on third-party uptime or pricing changes.
- No per-seat licensing: Scale to as many developers as you need without incremental costs.
Integrating with GitHub Actions (YAML Example)
Create .github/workflows/visual-regression.yml with the following workflow:
name: Visual Regression Tests
on: pull_request

jobs:
  visual-test:
    runs-on: ubuntu-latest
    services:
      lastest:
        image: lasteam/lastest:latest
        ports:
          - 3000:3000

    steps:
      - uses: actions/checkout@v4
      - uses: actions/setup-node@v4
        with:
          node-version: 20

      - run: npm ci
      - run: npx playwright install chromium

      - name: Run visual regression tests
        run: npx playwright test visual-tests/
        env:
          LASTEST_AUTH_TOKEN: ${{ secrets.LASTEST_AUTH_TOKEN }}

      - name: Upload diff artifacts
        if: failure()
        uses: actions/upload-artifact@v4
        with:
          name: visual-diffs
          path: test-results/

      - name: Post comment to PR
        uses: actions/github-script@v7
        with:
          script: |
            github.rest.issues.createComment({
              issue_number: context.issue.number,
              owner: context.repo.owner,
              repo: context.repo.repo,
              body: `Visual regression tests complete. Review diffs at http://localhost:3000/dashboard`
            });
The workflow triggers on every pull request. It spins up a Lastest Docker service, runs the visual tests against your application, uploads any diff screenshots as build artifacts, and posts a comment to the PR with a link to the dashboard for human review. With this workflow, every PR automatically triggers visual regression tests and posts a human-reviewable diff report. This visual regression testing GitHub Actions setup ensures that no visual bug goes unnoticed before merge. For a deeper walkthrough - branch baselines that fork on PR open and merge on PR merge, the reusable GitHub Action, and GitLab MR comments - see the GitHub Actions integration guide.
Skip the boilerplate. The YAML above works, but you can drop the Docker-service plumbing entirely with the reusable Action and Smart Run built in. Start a project on Lastest Cloud (flat $299/month, no per-screenshot or per-seat fees) or self-host for free and have PR-gated visual diffs - already filtered for flaky noise - posting to your pull requests today. Prefer to see it first? Browse live demos of the three-engine diff and review workflow.
Choosing the Right Diff Engine: Pixel vs. Structural vs. Perceptual
Choose pixel diff for pixel-perfect UI elements like icons and buttons, structural diff for layout-heavy pages, and perceptual diff for full-page screenshots where minor anti-aliasing or font-rendering differences should be ignored. Lastest ships all three engines - Pixelmatch, SSIM, and Butteraugli - so you do not have to pick a single strategy for your whole suite.
Pixel diff (Pixelmatch) performs an exact pixel-by-pixel comparison, highlighting every single changed pixel in red. It is fast and precise, but noisy. Use it when precision matters most: buttons, icons, logos, and any element where a one-pixel shift is a genuine bug. Pixel diff is terrible for responsive layouts, where every viewport size inevitably shifts pixels, and for content-heavy pages where text wrapping changes cause cascading pixel differences.
Structural diff (SSIM) uses the Structural Similarity Index to compare the layout and structure encoded in the rendered image, rather than weighting every pixel equally. It is sensitive to layout shifts, added or removed elements, and reflow, while tolerating small local pixel noise. Use it when you care about whether the structure of the page is correct, not whether the exact pixels match.
Perceptual diff (Butteraugli) models human perception, applying a tolerance that ignores differences below a certain visual significance. Anti-aliasing artifacts, font-rendering inconsistencies between operating systems, and subtle color variations are absorbed by the tolerance, so it catches real bugs while staying quiet on rendering noise. Use perceptual diff for full-page screenshots, cross-browser comparisons, and any scenario where pixel-perfect matching would produce too many false positives.
| Diff Engine | Best For | Worst For |
|---|---|---|
| Pixel (Pixelmatch) | Icons, buttons, pixel-perfect UI | Responsive layouts, font rendering |
| Structural (SSIM) | Layout shifts, reflow, content-heavy pages | Tiny localized pixel-perfect changes |
| Perceptual (Butteraugli) | Full-page screenshots, cross-browser | Exact matches (too tolerant for pixel-perfect) |
A practical recommendation: run all three engines on every test and let the platform surface the meaningful failures. When a button shifts by one pixel, the pixel diff catches it. When a layout breakpoint reflows a section, the structural diff catches it. And when a new font version renders text slightly differently, the perceptual diff ignores it. This layered approach catches layout shifts and visual anomalies without introducing noise. Lastest pairs this with stabilization (timestamp freezing, network-idle waits, font-loading waits, auto-masking of dynamic content) so your baselines stay consistent across operating systems. See the full feature list for how the engines and stabilization combine.
Managing Baselines and False Positives in CI: Best Practices for 2026
The number one pain point in visual regression testing is baseline management. Baselines go stale. Dynamic content creates false positives. Teams suffer from alert fatigue and start ignoring visual regression failures. Here are five specific visual regression testing CI/CD best practices 2026 to keep your pipeline reliable.
1. Never auto-approve overnight baselines. It's tempting to automate baseline updates - schedule a nightly job that re-baselines everything and moves on. Don't do this. If a baseline changes, a human must approve it through the dashboard. A configuration change or a broken build could silently update a baseline, and you would ship a regression. Always require explicit human approval for baseline updates.
2. Set a "diff tolerance" threshold. Start at 0.5% for pixel diff and raise to 2% for perceptual diff. The tolerance slider in perceptual diff engines ignores minor anti-aliasing differences and font-rendering inconsistencies. If you see too many false positives, increase the tolerance incrementally. If you miss genuine regressions, decrease it.
3. Exclude dynamic content with masks or regions. CSS animations, third-party widgets, dynamic dates, and ad containers produce different output on every render. Use CSS selectors to mask these regions from comparison. Most visual regression tools allow you to specify ignore regions per test. Without this, every PR will show a false positive from the animated carousel on your homepage.
4. Run on a schedule, not just on PRs. PR-based testing catches changes introduced by individual commits. But visual regressions can also come from environment changes: a CDN upgrade, a base image update, or a third-party script that changed behavior. Run your visual regression suite on a daily or weekly schedule against your staging environment to catch integration regressions that no single PR would trigger.
5. Archive baselines after each release. Baselines accumulate indefinitely. After four releases, a test might have a dozen baselines stored, and the diff engine doesn't know which one to compare against. Archive baselines at each release tag and delete versions older than three releases. This keeps the comparison target clear and prevents stale baselines from causing spurious failures.
Scaling Visual Regression for Enterprise Teams: Compliance, Role-Based Access, and Self-Hosting
Enterprise teams face requirements that small startups don't. Data residency, compliance frameworks, and role-based access are non-negotiable for organizations handling sensitive customer data or operating in regulated industries. Visual regression testing for enterprise teams requires infrastructure that scales with governance needs.
Compliance through self-hosting. When visual tests capture screenshots of internal dashboards, customer portals, or financial applications, those images are sensitive data. Sending them to a third-party cloud service isn't an option for GDPR-compliant organizations or teams subject to SOC2 audits. A self-hosted visual regression testing pipeline ensures that all visual data - baselines, diffs, and test artifacts - stays within your VPC. No data ever leaves your infrastructure.
Role-based access control. Not every team member should be able to approve baseline changes. A developer diffing a new feature shouldn't have the same permissions as a QA manager reviewing an entire release. Deploy a dashboard where access is tiered: developers can view diffs and trigger test runs, QA engineers can approve baseline updates, and administrators manage configuration. This prevents unauthorized baseline changes and provides an audit trail for every approval.
Multi-project management. Enterprises running microservices or monorepos need to manage visual tests across dozens of projects. Each project needs its own baseline set, CI pipeline, and approval workflow. A self-hosted solution runs parallel pipelines across projects without per-seat or per-project licensing costs. Per-screenshot and per-seat billing on hosted tools becomes expensive at scale; Lastest's self-hosted version is free with unlimited screenshots and replays, and Cloud is a flat $299/month if you would rather not run the ops. Smart Run reads your git diffs and runs only the tests your change touches, so a monorepo PR does not trigger the entire suite.
Enterprise teams need self-hosting not as a convenience, but as a requirement. It provides the data control, access management, and cost predictability that cloud solutions cannot match at scale.
Common CI/CD Integration Pitfalls & How to Avoid Them
The most common CI/CD integration pitfalls are timeouts (because screenshots take longer than unit tests), flaky baselines (because dynamic content isn't masked), and alert fatigue (because teams auto-approve every diff without review).
Pitfall: Timeouts. Visual regression tests take 10-30 seconds per screenshot, compared to milliseconds for unit tests. A suite of 50 tests can easily exceed the default CI timeout.
Quick fix: Increase timeout-minutes in your CI workflow configuration. For GitHub Actions, set timeout-minutes: 15 or higher. Alternatively, run your test suite in parallel shards - split the 50 tests across 5 runners, each handling 10 tests.
Pitfall: Flaky baselines from dynamic content. Animated elements, rotating banners, and live timers produce different output on every render. Without masking, these cause false positives on every PR. Quick fix: Use ignore regions with CSS selectors. Each test can specify selectors for elements that should be excluded from comparison. Both structural and perceptual diff engines support this.
Pitfall: Alert fatigue from auto-approving baselines. Teams that configure automatic baseline updates see every diff silently absorbed. Nobody reviews the changes, and regressions slip through. Quick fix: Require human approval for every baseline update via the dashboard. If a baseline changes, the test fails, and a human must explicitly approve the new baseline. This single rule eliminates most false positives.
Pitfall: Too many tests. Running visual regression on every page of a large application creates a 30-minute CI pipeline that nobody wants to wait for. Quick fix: Prioritize critical paths. Test login flows, checkout pages, dashboards, and any page with revenue impact. Add secondary pages later. Run the full suite on a schedule; run the critical suite on every PR.
Pitfall: Inconsistent environments. Visual tests that pass locally fail in CI because of different browser versions, operating system rendering differences, or missing fonts.
Quick fix: Use the same Docker image for local development and CI. If your CI runner uses mcr.microsoft.com/playwright:v1.40.0-focal, your local tests should use the same image. This eliminates environment-related false positives entirely.
Frequently Asked Questions
What is the difference between visual regression testing and snapshot testing? Snapshot testing compares text-based output (strings or DOM) and fails on any text change, producing a cryptic diff log. Visual regression testing compares rendered screenshots, produces a side-by-side visual diff, and handles dynamic content through configurable tolerance thresholds.
How long does it take to set up a visual regression testing pipeline? Most teams can set up a basic pipeline in 1-2 hours, including writing initial test scripts, configuring Docker, and integrating with CI/CD. The most time-consuming step is approving the initial baselines for each page under test.
Do I need to write test scripts for every single page in my application? No. Focus on critical user flows: login, checkout, dashboards, and high-traffic pages. Run the critical suite on every PR and the full suite on a schedule. You can progressively add more pages over time.
How do I handle dynamic content like animations or rotating banners? Use CSS selector-based ignore regions to mask those elements from comparison. Lastest also auto-masks common dynamic content and supports masking specific coordinates for elements that can't be selected via CSS.
Can I run visual regression tests locally before pushing to CI? Yes, and you should. Run tests locally with the same Docker image your CI runner uses. Approve the initial baseline locally, then push. This catches setup issues early and speeds up the feedback loop.
How do I handle responsive designs? Test at multiple viewport widths. Set up test configurations for mobile (375px), tablet (768px), and desktop (1280px). Run these as separate test entries and compare each against its own baseline. This ensures layout changes at different breakpoints are caught independently.
Measuring ROI: What to Track and How to Report
Visual regression testing delivers measurable returns, but only if you track the right metrics. Present these to stakeholders to justify the investment and demonstrate impact.
Key metrics to track:
- False positive rate. Percentage of visual regression failures that are not actual regressions (e.g., dynamic content changes, environment differences). Target: below 10%. Track this monthly and adjust tolerance thresholds if it rises.
- Time saved in manual QA. Estimate the hours your team previously spent manually checking UI screenshots before each release. If a team of 5 spent 2 hours per release on visual review and you release weekly, that's 10 hours per week saved - 520 hours per year.
- Regressions caught before production. Count the number of visual bugs the pipeline catches before they reach users. A bug fixed in CI is far cheaper than one that ships, triggers support tickets, and gets hotfixed under pressure. Multiply your own average triage-and-fix cost by the bugs caught per quarter to get a concrete, defensible number for stakeholders.
- PR review cycle time. Measure how long PRs wait for visual validation. Without automation, a PR might wait 24 hours for a human visual review. With automated pipelines, that drops to minutes. A faster cycle time means faster deployments.
- Baseline drift. How often do baselines change? A sudden spike in baseline changes might indicate a broader design system change or a component refactoring that needs attention.
How to report: Create a monthly dashboard slide that shows these metrics. Include a before-and-after comparison of manual QA hours. Feature a "regressions caught" section with screenshots of actual bugs the pipeline stopped. When stakeholders see a visual diff of a broken layout that never reached users, the ROI becomes concrete.
Conclusion
Visual regression testing in CI/CD is no longer optional for teams that ship reliable user interfaces. The gap between logic testing and visual verification has been a persistent source of production bugs, wasted QA hours, and customer frustration. By implementing a pipeline that uses true image-comparison diff engines, manages baselines with human oversight, and runs on your own infrastructure, you eliminate that gap entirely.
The practical steps for visual regression testing in CI/CD are clear: start with a self-hosted Docker setup using Lastest, write Playwright-based tests for your critical paths, integrate with GitHub Actions for automatic PR checks, and choose the right diff engine for each use case. Manage baselines responsibly - require human approval, exclude dynamic content, and archive stale baselines. Lastest also auto-classifies every failure as a real regression, flaky, environment, or test-maintenance issue with a confidence score, so reviewers spend their time on the diffs that matter. For enterprise teams, self-hosting secures compliance and provides the access controls that hosted services cannot match.
The cost of not implementing visual regression testing is hidden but real: regressions that ship, customer trust eroded one pixel at a time, and developers burning hours on manual visual checks. The tools and patterns exist today. The only question is whether your pipeline will catch the next visual bug - or your customers will.
A generic pipeline gets you diffs. What keeps a pipeline alive past the first month is the noise filter in front of the human: three-engine pixel verification instead of a binary gate, twelve flaky-test guards plus animation freezing, AI failure classification that sorts real regressions from environment noise, and Smart Run that only tests what your diff touched. That is the difference between a check your team trusts and one they mute.
Get started. Self-host Lastest for free (open source, FSL-1.1-ALv2, unlimited screenshots and replays on your own infra), or skip the ops and run Lastest Cloud at a flat $299/month - create a project at app.lastest.cloud and connect a repo in minutes. Browse the docs and live demos to see the three diff engines and the review workflow in action, wire it into your pipeline with the GitHub Actions guide, then star and clone the repo on GitHub. If you are shipping a Next.js or React app, you can have a visual regression pipeline catching UI bugs in CI - without the false-positive tax - by this afternoon.