
Your React team deploys what looks like a harmless one-line CSS change. Unit tests pass. Code review is clean. But in production, the checkout button disappears on Safari, the navigation menu overflows on tablet, and a tooltip covers the "Submit" button on Firefox. Visual diff testing for React components is the missing layer that catches these pixel-perfect regressions before they reach your users.
Traditional testing approaches - unit tests, integration tests, and Jest snapshots - verify logic and structure. They don't verify what your users actually see. The difference is the assertion model: a unit test is a true/false assertion (expect(onClick).toHaveBeenCalled()) that says nothing about how the button looks, while visual diff testing is pixel verification - it scores the rendered screenshot and grades it unchanged, flaky, or changed against a baseline. As React applications become more visually complex with CSS-in-JS, dynamic theming, and responsive breakpoints, the gap between "tests pass" and "UI works correctly" widens every sprint.
This guide covers everything you need to know about visual diff testing for React components in 2026: what it is, why it matters, how AI is transforming the space, and how to set it up with free open-source tools today.
What Is Visual Diff Testing for React Components?
Visual diff testing for React components is an automated testing practice that compares screenshots of rendered UI components against baseline images to detect unintended visual changes. When a developer modifies a component's styling, layout, or markup, the testing tool captures a new screenshot and compares it pixel-by-pixel (and structurally) to the approved baseline. Any difference gets flagged for human review.
This differs fundamentally from Jest snapshot testing. Jest snapshots serialize the component's DOM tree into a JSON-like structure and compare text representations. They cannot detect:
- CSS rendering differences across browsers
- Font rendering variations between operating systems
- Layout shifts caused by undefined container widths
- Color mismatches introduced by CSS variable changes
- Animation or transition glitches
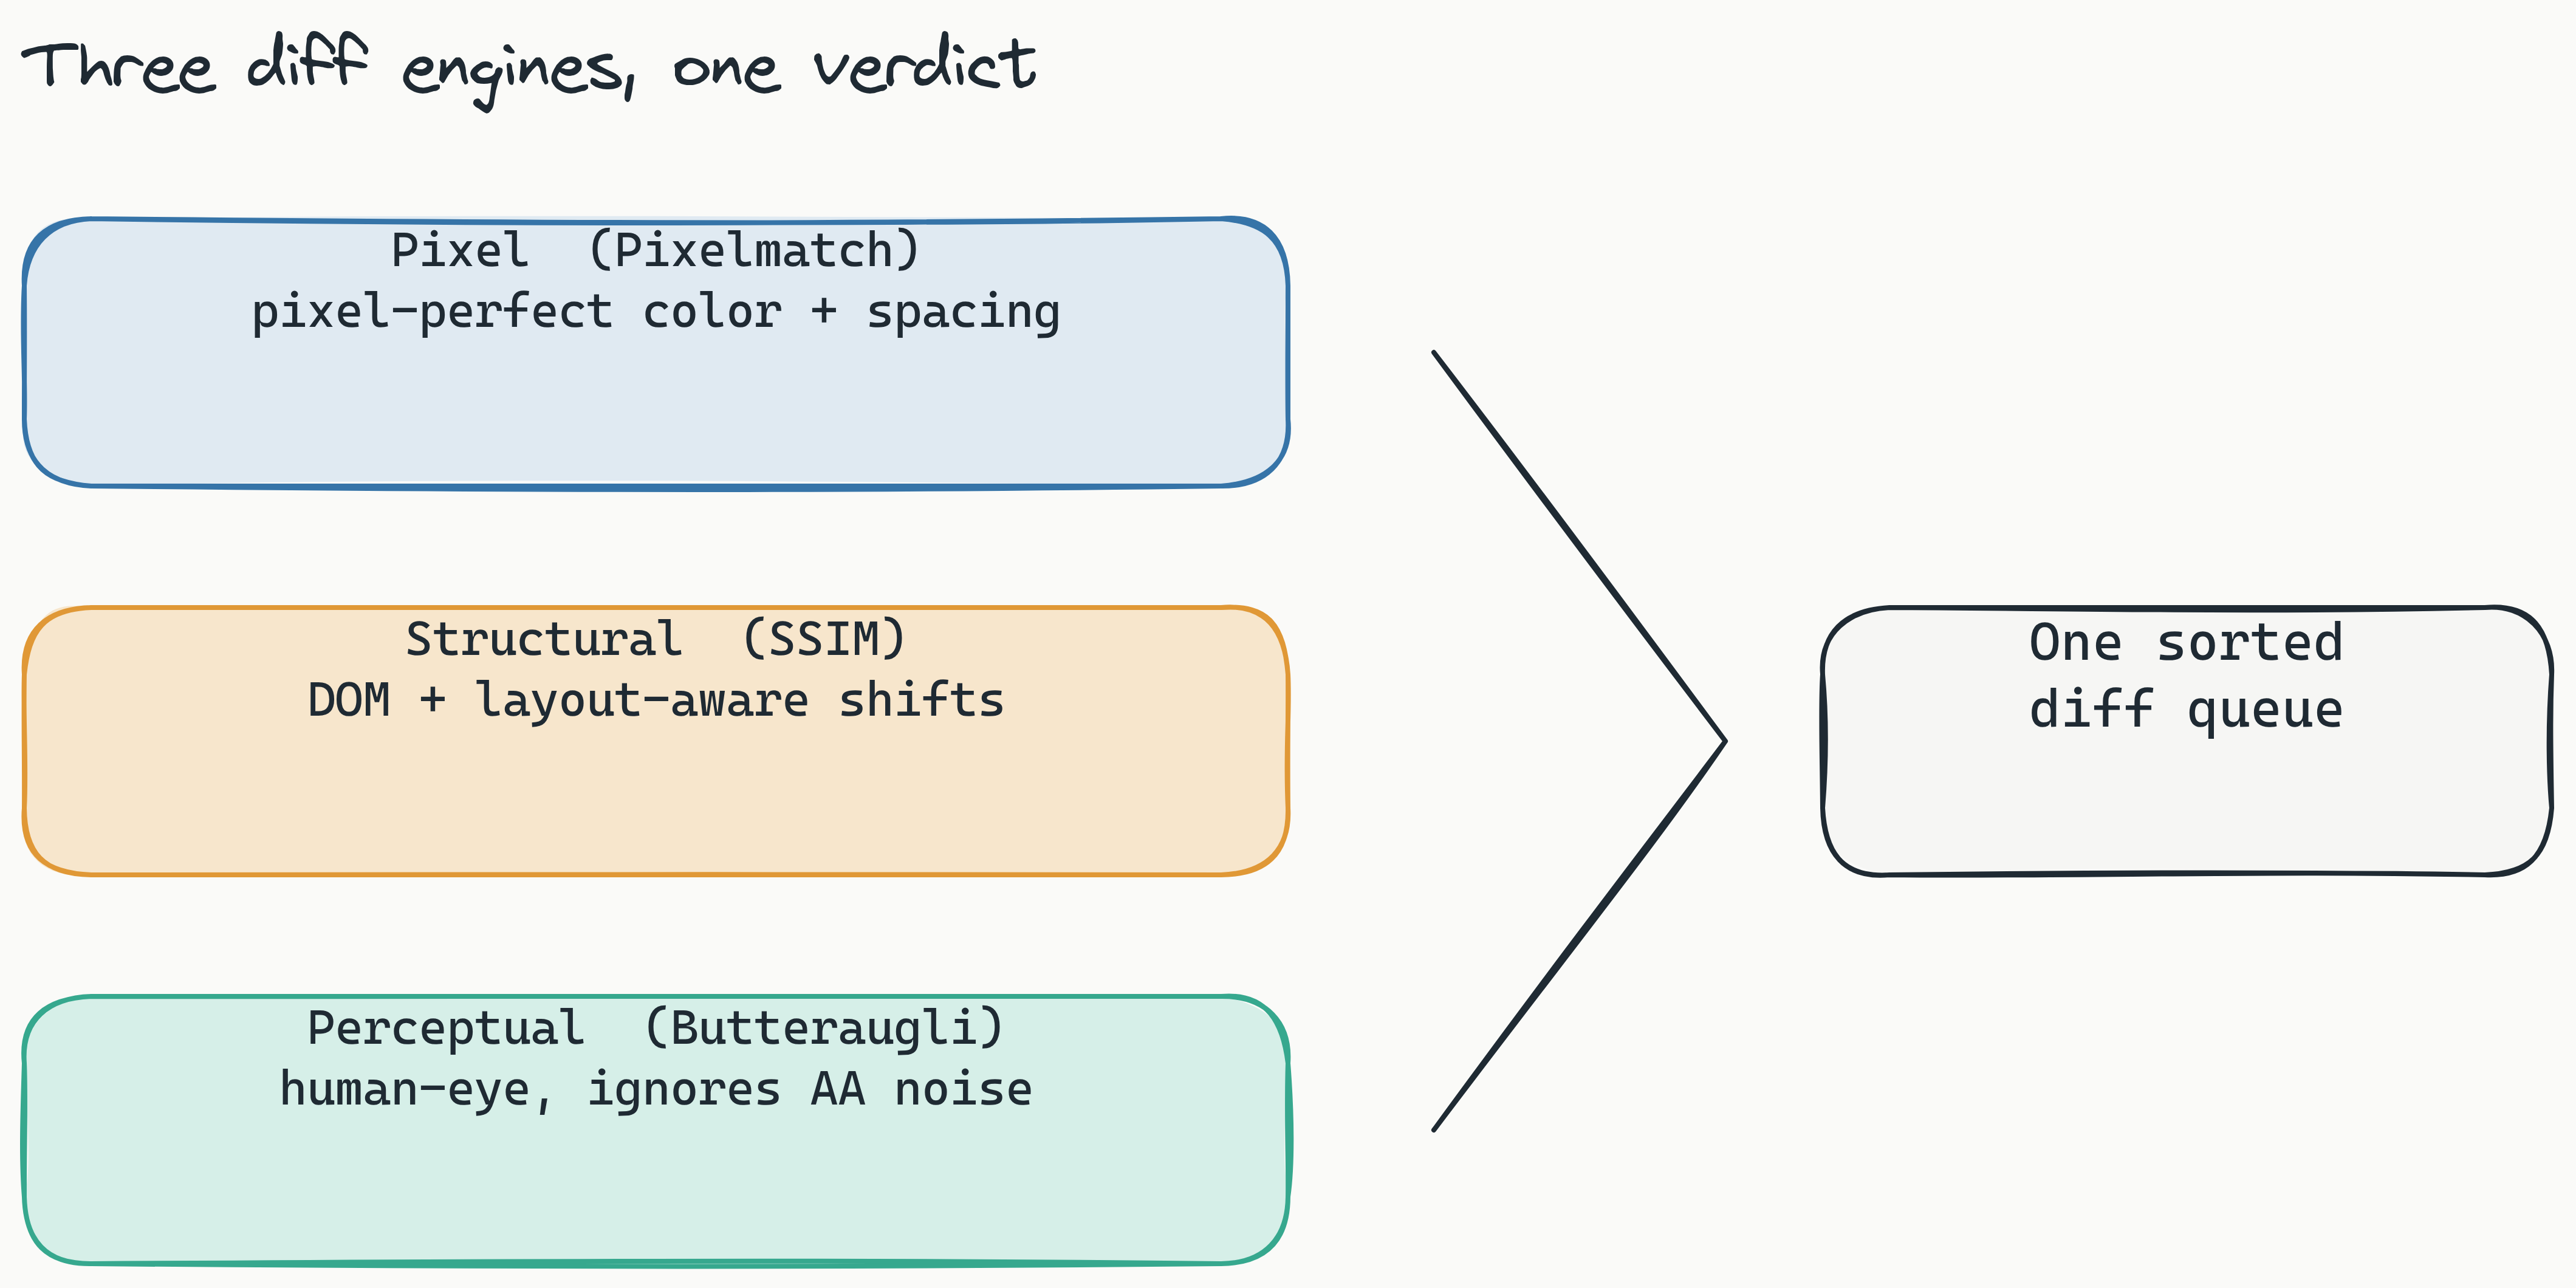
Visual diff testing uses three distinct approaches to catch these issues:
- Pixel diff: Compares every pixel in the screenshot. Catches color changes, spacing shifts, and border inconsistencies with surgical precision. Best for static components with fixed layouts.
- Structural diff: Analyzes the component's layout structure - element positions, sizes, and alignment. Catches layout shifts that pixel-level comparison might miss when content reflows.
- Perceptual diff: Mimics human visual perception by tolerating anti-aliasing differences, font smoothing variations between operating systems, and minor rendering inconsistencies that don't affect visual meaning.
Lastest combines all three diff engines in a single testing pipeline: Pixel (Pixelmatch), Structural (SSIM), and Perceptual (Butteraugli). It prioritizes the most appropriate comparison method for each detected change. This multi-engine approach reduces false positives while maintaining high detection sensitivity. See the full feature list for how the engines stack.
How is visual diff different from snapshot testing in Jest? Visual diff testing for React components captures actual browser screenshots - including CSS rendering, font loading, and cross-browser differences - while Jest snapshots compare serialized DOM trees as text. Snapshot testing misses CSS, font rendering, and cross-browser rendering differences that visual diff testing catches automatically.
Why React Components Need Visual Regression Testing in 2026
Visual regression testing React components 2026 is more critical than ever because the surface area for visual bugs has expanded dramatically. Modern React applications use:
- CSS-in-JS libraries like styled-components and Emotion, where style changes live in JavaScript files and are harder to catch in code review
- Dynamic theming that changes color palettes, spacing scales, and typography at runtime
- Responsive breakpoints that multiply the number of visual states per component
- Component libraries where a single style change cascades through dozens of instances
The real danger is the "one-line CSS change" that appears innocuous in a pull request but breaks the entire layout. A developer changes padding from 16px to 24px on a shared button component. That change looks correct on the primary button. But it breaks alignment on the secondary button used in a modal, overflows the card component on mobile, and shifts the footer layout by 8 pixels.
Unit tests for these scenarios are almost impossible to write. They require asserting specific pixel values, CSS computed styles, and layout positions - tests that break with every intentional design change and become a maintenance burden.
The component abstraction that makes development faster also makes visual bugs harder to detect: one shared component renders in dozens of contexts, so a single style edit can regress places you never opened in the PR. That is exactly where visual diff testing for React apps earns its keep.
What types of bugs does visual regression catch that unit tests miss? Visual regression testing catches layout shifts, overflow issues, color mismatches, font rendering differences between operating systems, animation glitches, responsive breakpoint failures, hover and focus state bugs, z-index layering problems, and CSS inheritance conflicts. These bugs typically arise from the interaction between multiple style rules across components - a scenario no unit test can realistically simulate.
| Bug Type | Unit Test Detection | Visual Diff Detection |
|---|---|---|
| Layout shift | ❌ | ✅ |
| Color mismatch | ❌ | ✅ |
| Font rendering issues | ❌ | ✅ |
| Responsive breakpoint failure | ❌ | ✅ |
| Animation glitch | ❌ | ✅ |
| Z-index layering problem | ❌ | ✅ |
AI Visual Regression Testing: How It Changes the Game for React Teams
Traditional pixel-by-pixel visual diff tools suffer from a critical weakness: false positives. A tool that compares every pixel will flag anti-aliasing differences between Chrome and Firefox, font rendering variations between macOS and Windows, and animation timing differences between test runs. When a meaningful share of flagged diffs turn out to be noise, reviewers stop trusting the queue and start rubber-stamping it. That is how visual suites quietly die. We covered the trust dynamics in detail in Reducing False Positives in Visual Regression Testing.
AI visual regression testing for React components addresses this by learning the component's expected structure rather than memorizing pixel values. The AI model understands which differences are meaningful (a button moved 10 pixels to the left) and which are irrelevant (a font rendering difference between operating systems).
Lastest implements AI in two ways that directly benefit React teams:
- AI-powered test generation: Instead of writing tests manually, developers run through their component workflow once while the AI watches. The AI records interactions, captures screenshots at meaningful moments, and generates structured visual tests. This "one-time token cost" model means teams invest a small upfront effort to create baseline tests that run on every subsequent deployment with zero-token replays.
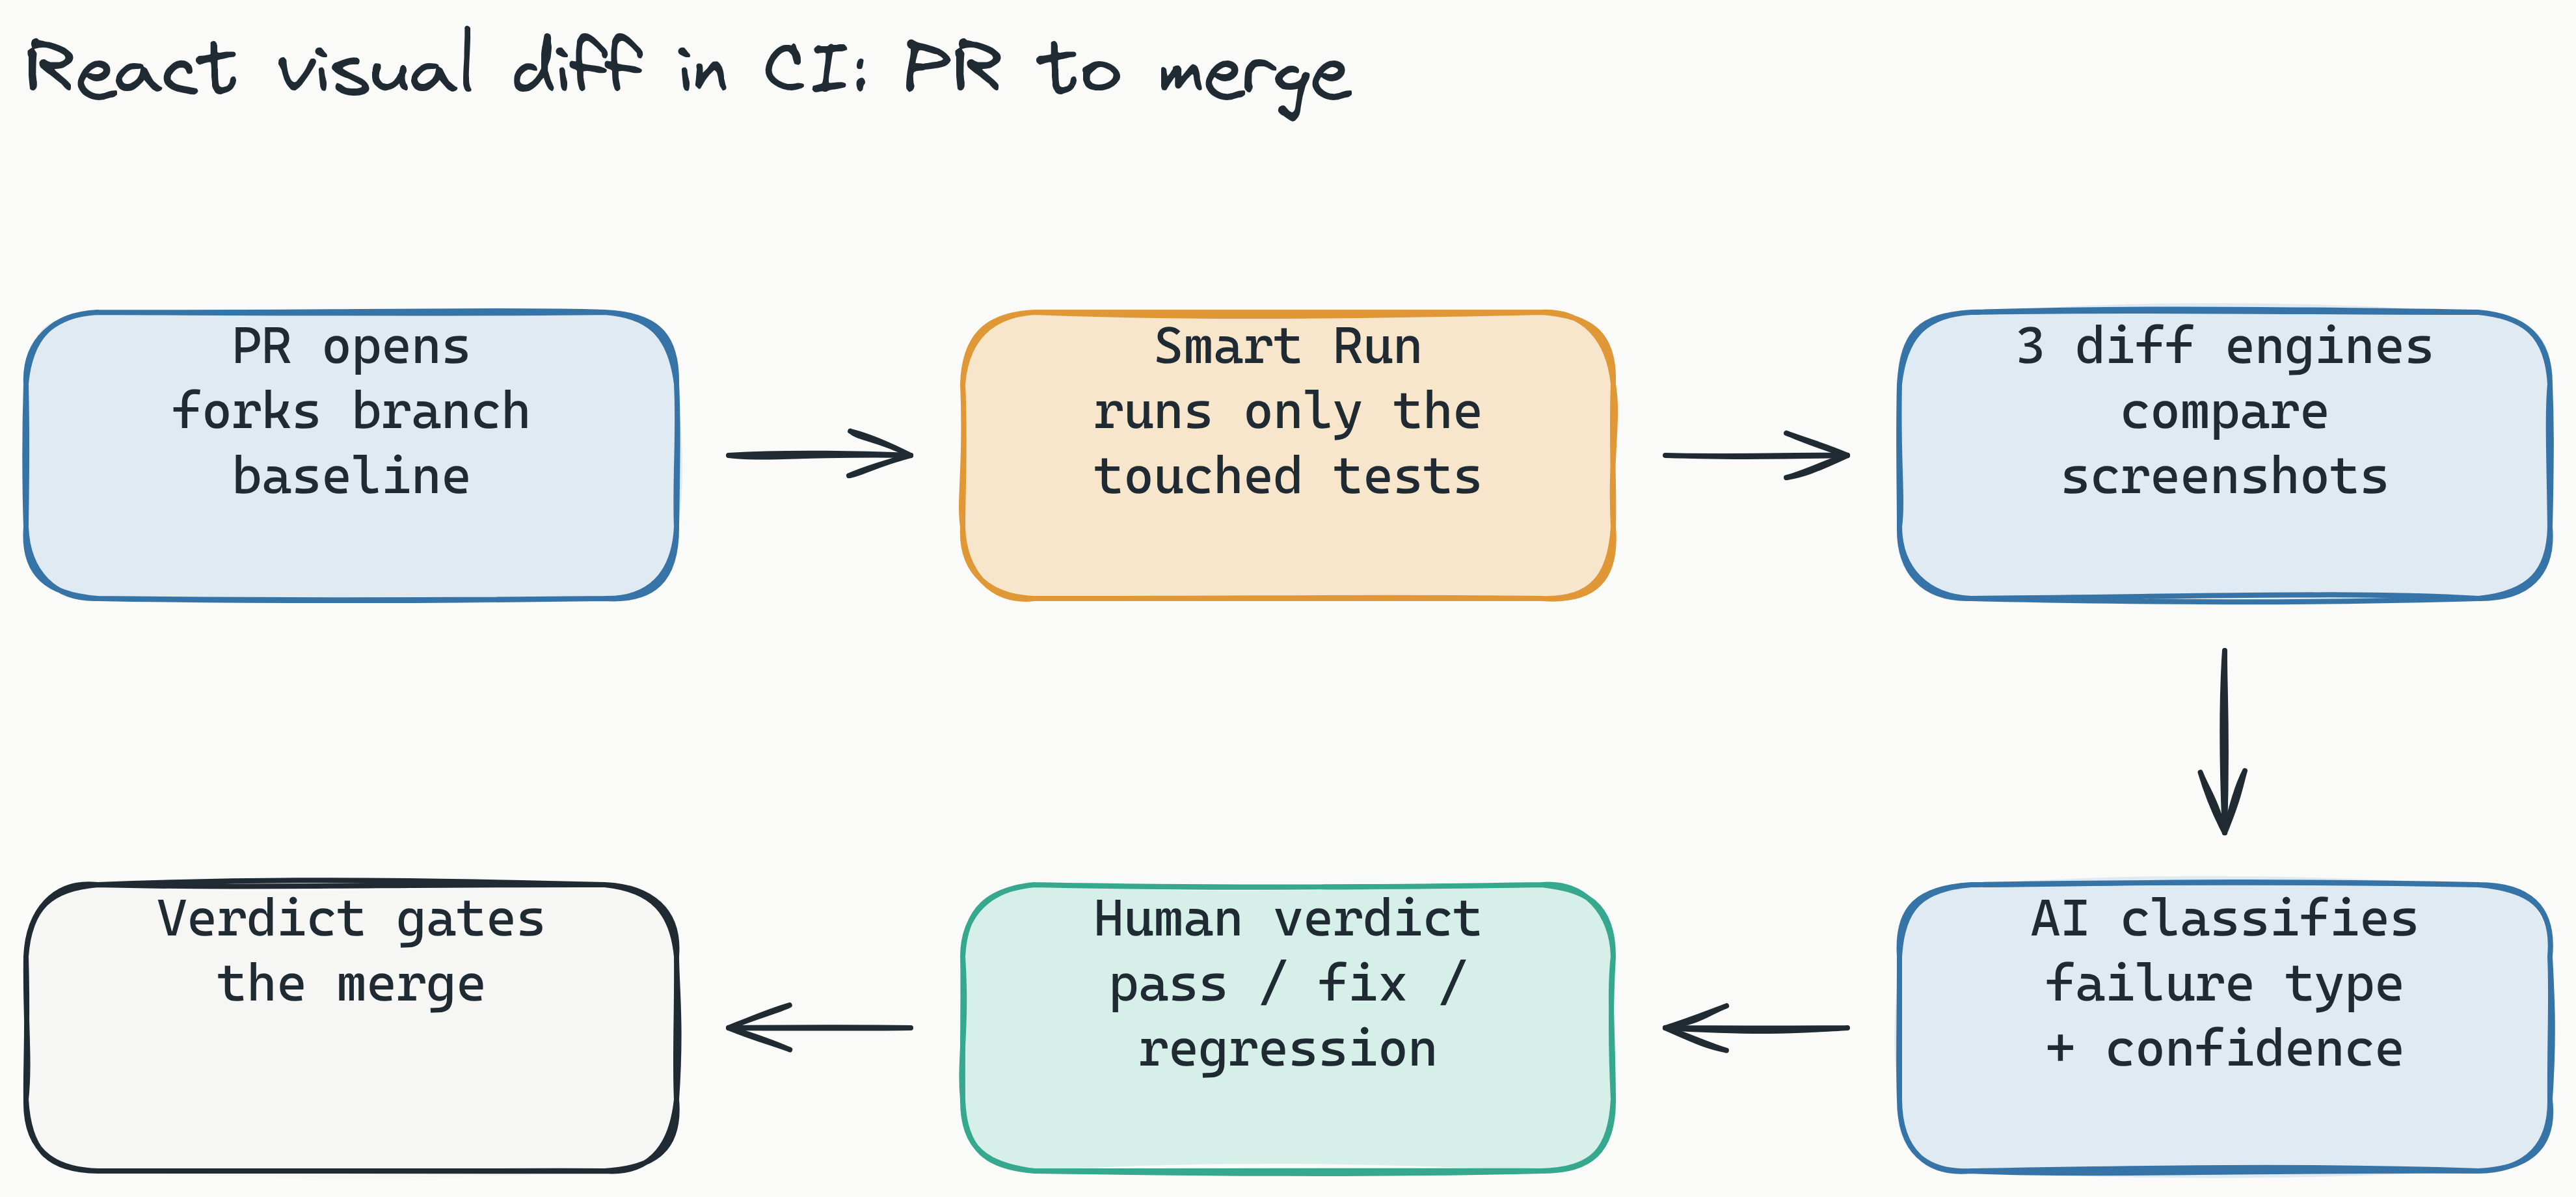
- AI failure classification: When a test fails, Lastest auto-classifies it as a real regression, a flaky run, an environment issue, or test maintenance, each with a confidence score and a short reasoning note. Structural changes (a button that moved 10 pixels) get surfaced ahead of superficial ones (a deliberate brand color tweak), so the queue sorts itself by what actually matters.
Crucially, the AI never approves its own work. Lastest is built around exactly one human review seam: a reviewer renders one of three verdicts - pass, fix, or regression - on each flagged change. The AI does the expensive pattern work; the human does the cheap judgment. You can also pick how much AI you want per test: AI-Free recording (air-gapped, no API keys), AI-Assisted (AI proposes, you approve every change), or Full Autonomous via the Play Agent. And because Lastest is bring-your-own-AI, you point it at Claude, the Anthropic API, OpenAI, OpenRouter, or a local Ollama model. No lock-in.
How does AI reduce false positives in visual regression? The AI model learns the component's expected visual structure and can ignore irrelevant pixel differences, such as anti-aliasing at curved corners or font rendering variations between operating systems. The human reviewer then validates flagged changes, ensuring only genuine regressions are caught while acceptable variations are ignored.
Open Source vs. Paid: The Best Free Visual Diff React Testing Options
The visual diff React testing free open source landscape includes fully open-source tools, paid SaaS platforms, and hybrid options. Here's how the major options compare for React component testing.
Fully open-source: BackstopJS and Playwright's built-in screenshot comparison are free but require manual baseline management, have no AI capabilities, and offer only basic pixel-level comparison. They work for small teams with simple components but become unwieldy at scale.
Open-source with optional cloud: Lastest self-hosted is free forever (FSL-1.1-ALv2 license) with all core features - three diff engines, AI test generation, the human review dashboard, 7-layer self-healing selectors, and CI/CD integration. On your own infrastructure, screenshots and replays are unlimited. The optional Lastest Cloud plan is a flat $299 per month (no per-seat fees, no per-screenshot fees) and adds managed infrastructure so you skip the ops.
Paid SaaS: Percy starts from around $199 per month, Chromatic from around $179 per month, and Applitools from around $699 per month. These tools offer polished dashboards and ecosystem integrations, but they are cloud-only and price on a per-screenshot or per-seat model, so your bill climbs with usage and your screenshots leave your network.
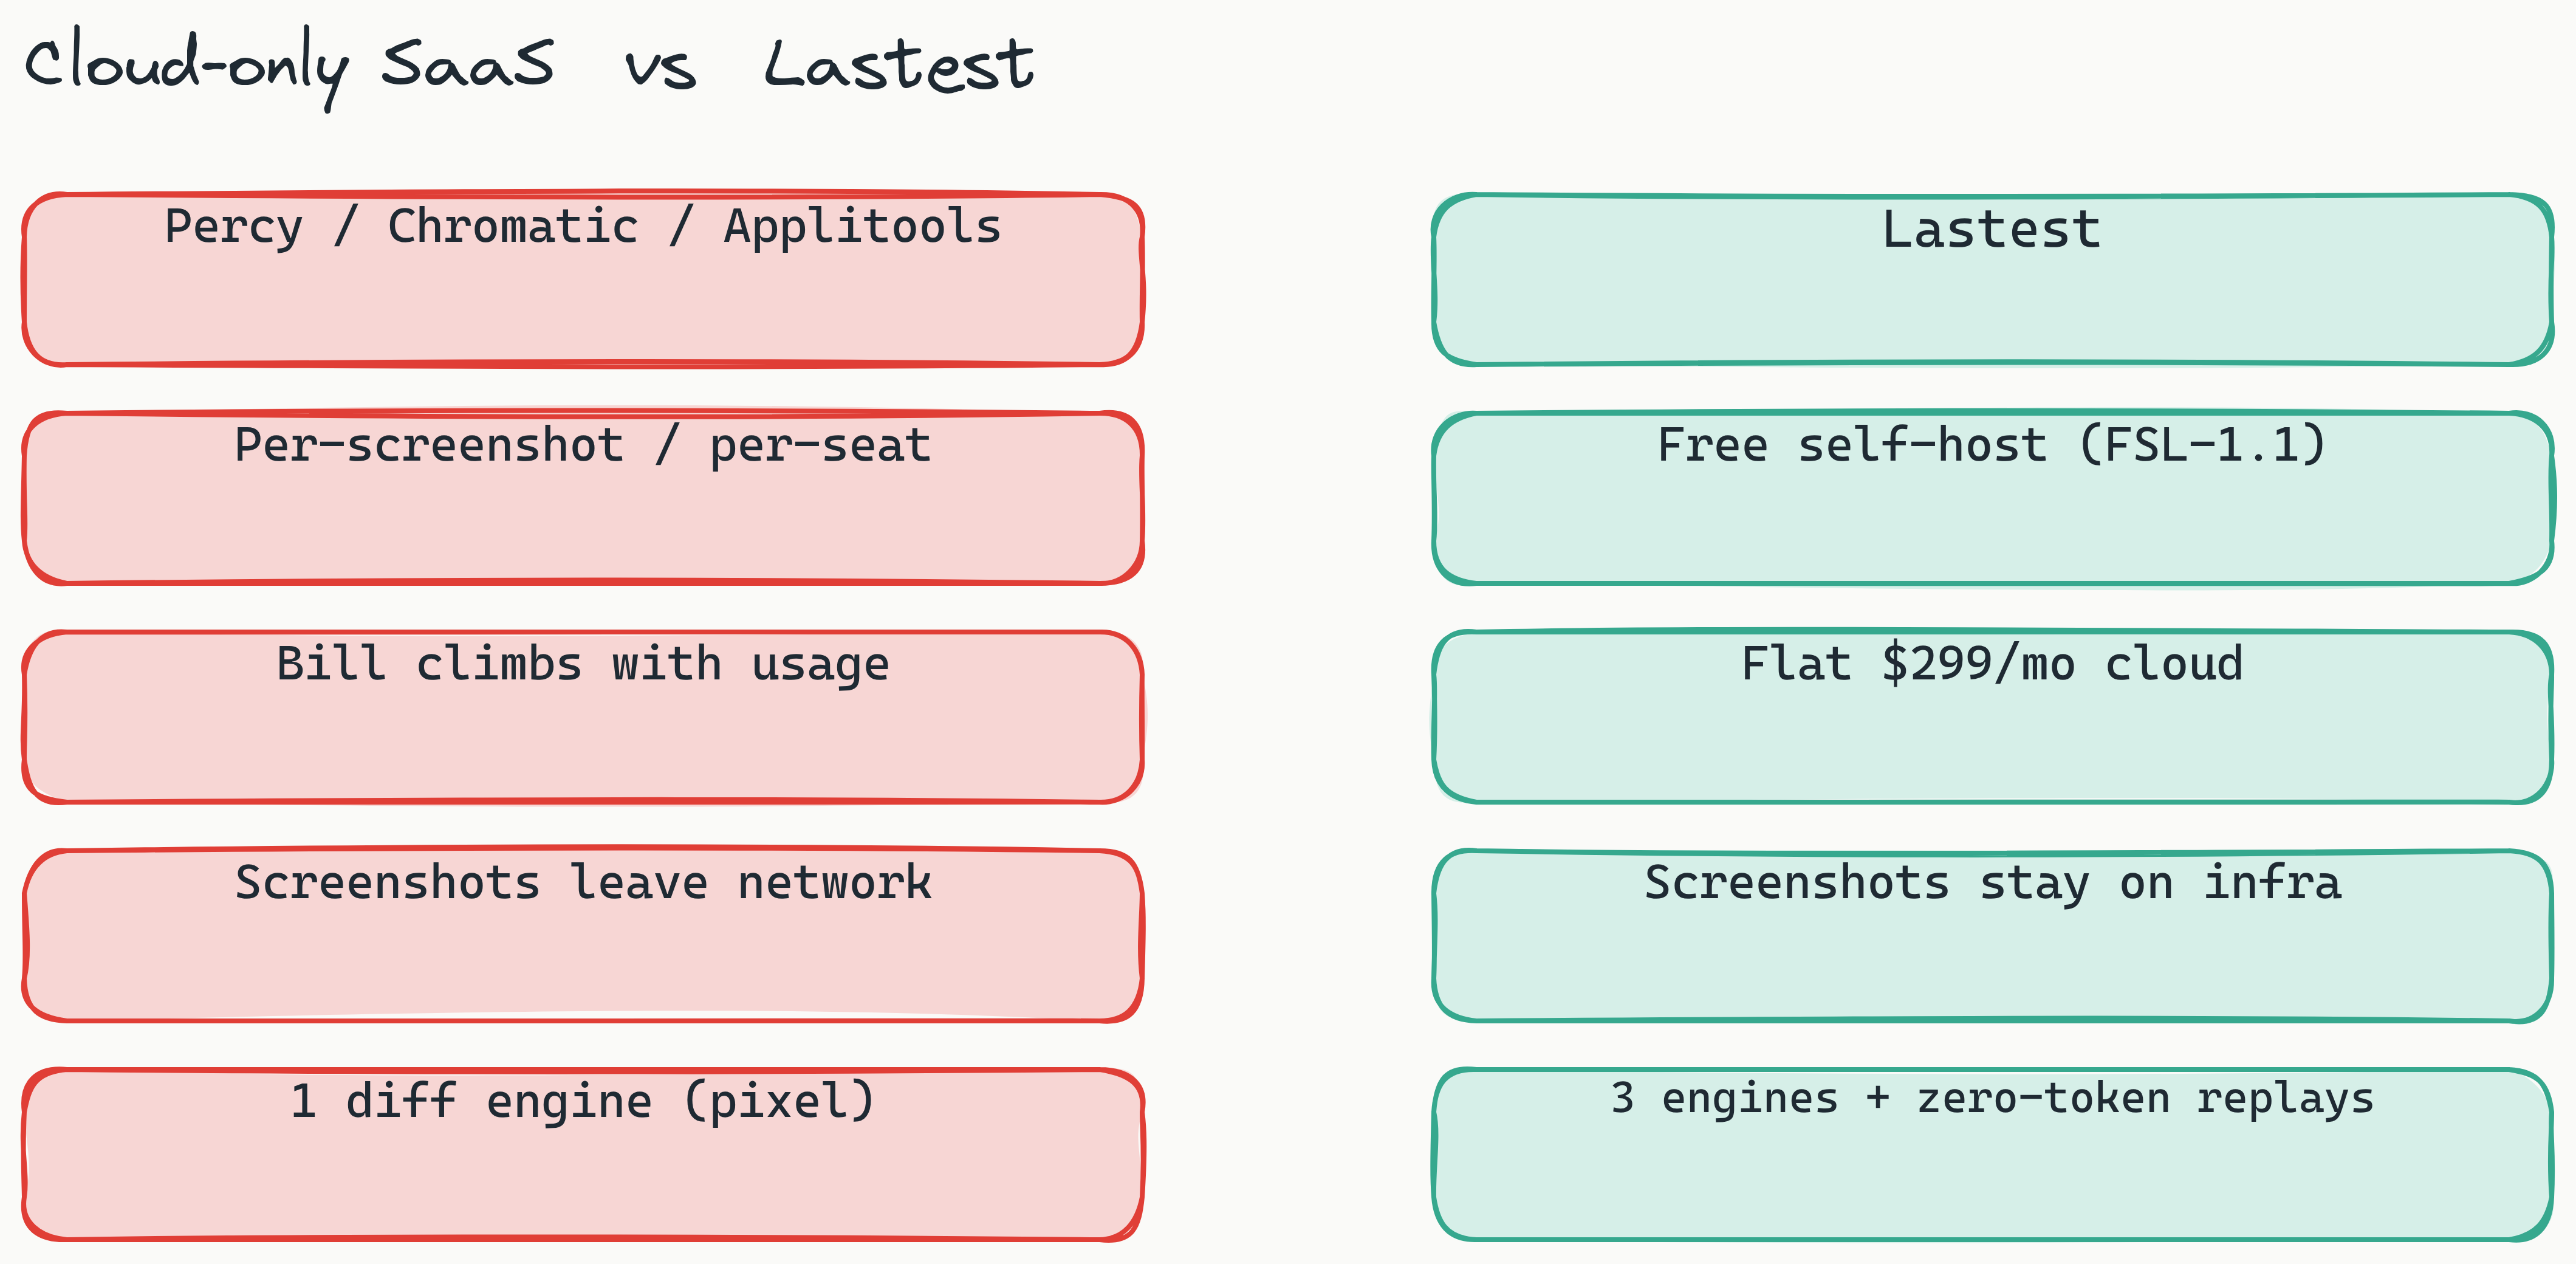
| Tool | Self-Hosted | AI-Powered | Open Source | Starting Price | Diff Engines |
|---|---|---|---|---|---|
| Lastest | ✅ Free | ✅ Yes | ✅ FSL-1.1 | Free self-hosted; $299/mo cloud (flat) | 3 (pixel, structural, perceptual) |
| Percy | ❌ No | ❌ No | ❌ | from ~$199/mo | 1 (pixel) |
| Chromatic | ❌ No | ❌ No | ❌ | from ~$179/mo | 1 (pixel) |
| Applitools | ❌ No | ✅ Yes | ❌ | from ~$699/mo | 1 (AI-powered) |
| BackstopJS | ✅ Free | ❌ No | ✅ Yes | Free | 1 (pixel) |
Is there a truly free option for visual diff testing React components? Yes - Lastest's self-hosted version is fully free and open-source under the FSL-1.1-ALv2 license. Unlike "freemium" tools that limit features or screenshot counts behind paywalls, the free version includes all core capabilities: three diff engines, AI-powered test generation, the human review dashboard, and full CI/CD integration, with unlimited screenshots and replays. The cloud upgrade adds only managed hosting - not crippled features. This open-source advantage means no vendor lock-in, and your data stays on your infrastructure.
Self-Hosted Visual Regression Testing: Why Enterprises Are Switching
Enterprise React teams are increasingly moving testing infrastructure on-premise, and visual regression testing is no exception. Self-hosted visual regression testing React offers three advantages that cloud-only tools can't match:
Data sovereignty: Test screenshots contain renderings of proprietary UI components, internal design systems, and unreleased product features. Sending these screenshots to external cloud services creates data exposure risk. Self-hosting ensures screenshots never leave your infrastructure.
Compliance readiness: GDPR, SOC2, HIPAA, and other regulatory frameworks require organizations to control where data is stored and processed. Cloud-only visual testing tools create compliance gaps for regulated industries. Self-hosted solutions run entirely within your VPC or on-premise environment.
Cost predictability: Cloud visual testing tools typically charge per screenshot or per test run. Teams that run many test suites or deploy frequently see costs scale linearly with usage. Self-hosted Lastest has a fixed infrastructure cost regardless of test volume - unlimited developers, unlimited test runs, unlimited screenshots. It is also cheap to run constantly: Lastest uses AI only when you create or fix a test, and every replay after that is plain Playwright execution. These zero-token replays mean you can run your suite thousands of times a day without burning a cent in model tokens.
Lastest's Docker-based deployment makes self-hosting straightforward: a single docker-compose up command starts the full visual regression suite on any Docker host. The Docker image includes all three diff engines, the AI model, the human oversight dashboard, and CI/CD integration points. It works with GitHub Actions, GitLab CI, Jenkins, and any CI runner.
How much maintenance does self-hosting a visual diff tool require? With Docker and Lastest, maintenance is minimal. The team pulls an updated Docker image monthly for new diff engine versions and security patches. Typical maintenance tasks include monitoring disk usage for accumulated test screenshots, configuring database backups, and rotating API tokens. Most teams report spending less than one hour per month on maintenance.
How to Integrate Visual Component Testing into Your CI/CD Pipeline
Integrating visual component testing into a CI/CD pipeline ensures that visual bugs are caught before code merges into main branches. Here's how to configure the pipeline with Lastest and GitHub Actions. For a deeper walkthrough, see our visual regression testing CI/CD guide.
GitHub Actions Example
Create .github/workflows/visual-test.yml:
name: Visual Regression Tests
on:
  pull_request:
    branches: [main]

jobs:
  visual-tests:
    runs-on: ubuntu-latest
    services:
      lastest:
        image: lastest/lastest:latest
        ports:
          - 3000:3000
        env:
          LASTEST_API_KEY: ${{ secrets.LASTEST_API_KEY }}

    steps:
      - uses: actions/checkout@v4
      - uses: actions/setup-node@v4
        with:
          node-version: 20
      - run: npm ci
      - run: npx playwright install --with-deps
      - run: npx playwright test
      - name: Upload test results
        uses: actions/upload-artifact@v4
        if: always()
        with:
          name: visual-diffs
          path: test-results/
GitLab CI Example
visual-test:
  image: mcr.microsoft.com/playwright:latest
  services:
    - name: lastest/lastest:latest
      alias: lastest
  script:
    - npm ci
    - npx playwright install
    - npx playwright test
  artifacts:
    when: always
    paths:
      - test-results/
Pass/Fail Gate Strategy
The CI pipeline should enforce a pass/fail gate: if any visual diffs exist and are unapproved, the pipeline fails and prevents the merge. The developer reviews diffs through the Lastest dashboard, approves intentional changes as new baselines, and rejects genuine bugs. The developer then re-runs the pipeline with the updated baselines. Reuse baseline screenshots across CI runs to reduce execution time, and run visual tests in parallel across browser instances for speed. With Smart Run, Lastest reads the git diff and executes only the tests your change actually touches, so a one-component PR doesn't re-shoot your entire suite. Branch baselines fork when a PR opens and merge back when it lands.
Can I run visual diff tests locally before pushing to CI? Yes - one of Lastest's advantages is running visual tests on your development machine before pushing to CI. Use the same Docker compose configuration locally and in CI, ensuring consistent baseline management. Developers can catch visual bugs before they ever reach the PR review stage, reducing CI wait times and preventing unnecessary pipeline failures.
Comparison: Lastest vs. Percy for React Component Testing
When evaluating Percy vs Lastest React component testing, teams typically consider pricing, architecture, and feature set. Here's a direct comparison.
| Feature | Lastest | Percy |
|---|---|---|
| Starting price | Free (self-hosted) / $299/mo flat (cloud) | from ~$199/mo |
| AI test generation | ✅ Included | ❌ Not available |
| Self-hosted option | ✅ Free, open-source | ❌ Cloud-only |
| Diff engines | 3 (pixel, structural, perceptual) | 1 (pixel) |
| Unlimited screenshots | ✅ Yes (self-hosted) | ❌ Metered / per-screenshot |
| Open source | ✅ FSL-1.1-ALv2 | ❌ Proprietary |
Pricing: Lastest's free self-hosted version eliminates per-screenshot costs entirely. The $299 per month cloud plan is flat, with no per-seat or per-screenshot fees. Percy prices on a metered, per-screenshot model, so teams that deploy frequently watch the bill climb with usage.
Architecture: Percy is cloud-only, meaning all test screenshots must leave your infrastructure. Lastest's self-hosted option keeps screenshots on your servers, with the cloud version available as an optional convenience.
AI capabilities: Lastest includes AI-powered test generation that watches manual testing sessions and generates visual tests automatically. Percy relies on manual test creation and lacks AI capabilities.
Diff engines: Lastest uses three diff engines (pixel, structural, perceptual) to catch different types of visual regressions. Percy uses pixel-level comparison only, which increases false positive rates for components with dynamic content or cross-browser rendering differences.
Integration: Both support GitHub Actions, GitLab CI, and common CI systems. Percy has a deeper ecosystem with native Jira, Slack, and GitHub integrations. Lastest focuses on core visual testing capabilities with flexible integration points.
When to choose Percy: Teams that need a mature ecosystem with deep Jira, Slack, and GitHub integrations, and prefer managed infrastructure without operational overhead. Percy's broader integration ecosystem is its primary differentiator.
When to choose Lastest: Teams that want cost savings, data sovereignty through self-hosting, AI-powered testing to reduce manual work, and the flexibility of open-source code. Lastest is particularly strong for enterprises with compliance requirements and startups that need to scale testing without scaling costs.
How does Lastest's pricing compare to Percy's? Lastest offers a free self-hosted version with all features included, plus a flat $299/month cloud option with no per-seat or per-screenshot fees. Percy starts from around $199/month on a metered, per-screenshot model, so costs scale with usage. Lastest's self-hosted option provides unlimited screenshots at no cost.
Setting Up Visual Diff with Playwright and Lastest: Step-by-Step
This section provides a practical, code-first walkthrough for setting up React UI testing with Playwright visual diff using Lastest.
Prerequisites
- Node.js 18 or later
- Docker installed and running
- A React project with Playwright installed (
npm init playwright@latest)
Step 1: Start Lastest with Docker
Create a docker-compose.yml file:
version: '3.8'
services:
  lastest:
    image: lastest/lastest:latest
    ports:
      - "3000:3000"
    volumes:
      - lastest-data:/data
    environment:
      - LASTEST_API_KEY=your-api-key-here

volumes:
  lastest-data:
Run: docker-compose up -d
Step 2: Configure Playwright forvisual testing
Create playwright.config.ts:
import { defineConfig, devices } from '@playwright/test';

export default defineConfig({
  testDir: './e2e',
  fullyParallel: true,
  forbidOnly: !!process.env.CI,
  retries: process.env.CI ? 2 : 0,
  workers: process.env.CI ? 1 : undefined,
  reporter: process.env.CI ? [['html'], ['lastest']] : 'html',
  use: {
    baseURL: 'http://localhost:3000',
    trace: 'on-first-retry',
    screenshot: 'on',
  },
  projects: [
    {
      name: 'chromium',
      use: { ...devices['Desktop Chrome'] },
    },
    {
      name: 'firefox',
      use: { ...devices['Desktop Firefox'] },
    },
    {
      name: 'webkit',
      use: { ...devices['Desktop Safari'] },
    },
  ],
});
Step 3: Write Your First Visual Test
Create e2e/button.spec.ts:
import { test, expect } from '@playwright/test';

test('primary button renders correctly', async ({ page }) => {
  await page.goto('/components/button');
  const button = page.locator('button.primary');
  await expect(button).toBeVisible();

  // Take a visual snapshot for Lastest comparison
  await expect(page).toHaveScreenshot('primary-button.png', {
    maxDiffPixels: 100, // Configurable threshold
  });
});

test('button hover state', async ({ page }) => {
  await page.goto('/components/button');
  const button = page.locator('button.primary');
  await button.hover();
  await expect(page).toHaveScreenshot('primary-button-hover.png');
});
Step 4: Test Responsive Breakpoints
test('button on mobile viewport', async ({ page }) => {
  await page.setViewportSize({ width: 375, height: 812 }); // iPhone X
  await page.goto('/components/button');
  await expect(page).toHaveScreenshot('primary-button-mobile.png');
});

test('button tablet viewport', async ({ page }) => {
  await page.setViewportSize({ width: 768, height: 1024 });
  await page.goto('/components/button');
  await expect(page).toHaveScreenshot('primary-button-tablet.png');
});
Step 5: Run Tests and Review Diffs
# Run visual tests locally
npx playwright test --reporter=list,lastest

# View results in Lastest dashboard
open http://localhost:3000
The Lastest dashboard will show each test with its baseline image, the new screenshot, and a diff overlay highlighting changes. Use the AI-powered diff analysis to filter out false positives. Approve intentional changes as new baselines or reject genuine bugs for investigation.
Step 6: Automate Baseline Updates
// Reuse baseline management in CI
if (process.env.CI) {
  // Automatically approve diffs when base branch changes
  test('update baseline on main merge', async ({ page }) => {
    const baseBranch = process.env.BASE_BRANCH || 'main';
    await page.goto('/components/button');
    // Lastest handles baseline updates via API
    await expect(page).toHaveScreenshot('primary-button.png');
  });
}
Best Practices for Visual Diff Testing React Components
Successful visual diff testing requires more than just tool setup. These React visual testing best practices help teams maximize value while minimizing friction.
1. Test at the Component Level, Not Page Level
Component-level tests isolate visual changes to a single component, making diffs easier to understand. A button component test produces a focused diff showing exactly what changed on the button. A full-page test produces a massive diff that includes every component on the page, making it hard to identify the source of the regression.
2. Use Consistent Test Data
Visual tests should use deterministic data to prevent false positives from dynamic content. Use mock data, fixture files, or API stubs to ensure the same content renders in every test run. For components that display user-generated content, create representative test data that remains stable across test executions.
3. Set Appropriate Diff Thresholds
Not all visual differences are bugs. Set maxDiffPixels or maxDiffPixelRatio to allow for acceptable variations like anti-aliasing or font hinting differences between browsers. Start with strict thresholds and relax them only after confirming the differences are benign.
4. Maintain Baselines Carefully
Baseline images are the source of truth for visual testing. Store them in version control alongside your test code. When intentional design changes occur, update baselines systematically - not by deleting all baselines and regenerating them, but by reviewing each diff and approving legitimate changes through the Lastest dashboard.
5. Run Visual Tests in Parallel
Visual tests are I/O-bound (screenshot capture and comparison), not CPU-bound. Run them in parallel across browser instances and test files to minimize CI execution time. Lastest supports parallel test execution natively.
6. Establish a Review Workflow
Define who reviews visual diffs and how quickly they must respond. Larger teams often designate a "visual review champion" each sprint who reviews diffs daily. Smaller teams can batch review diffs during sprint ceremonies. The key is preventing unapproved diffs from merging into main branches.
Common Challenges and How to Overcome Them
Even with the best setup, visual diff testing presents challenges. Here's how to handle the most common ones.
Challenge: Flaky Tests from Animation and Transitions
Animations cause screenshots to capture intermediate visual states, producing false positives. Solution: Disable animations in test environments. In Playwright, add page.addStyleTag({ content: '*, *::before, *::after { animation: none !important; transition: none !important; }' }) before taking screenshots. Or skip the hand-rolled style tag entirely: Lastest ships animation freezing plus a full set of flaky-test guards (timestamp freezing, network-idle and DOM-stability waits, font-loading wait, burst capture) that neutralize the moving parts before the diff runs.
Challenge: Dynamic Content Causing False Diffs
Components that display dates, random IDs, or external data will produce different screenshots on each test run. Solution: Mock API responses and use fixed test data. Use Playwright's route interception to return consistent data: await page.route('**/api/data', route => route.fulfill({ json: mockData })). Beyond stubbing, Lastest gives you a data filter (mask selectors, auto-mask of dynamic content, and text-region-aware OCR diffing so live data never trips the diff) and a show-area filter that scopes both the comparison and the reviewer's view to the region that actually changed - which pairs naturally with component-level testing to keep every diff focused.
Challenge: Large Baseline Storage Requirements
Teams with many components and multiple browsers accumulate gigabytes of baseline images. Solution: Only store baselines for the most critical viewports and browsers. Use Lastest's baseline compression and storage optimization. Archive old baselines for components that haven't changed in months.
Challenge: Review Bottleneck for Large Teams
When dozens of developers create pull requests daily, visual diff review becomes a bottleneck. Solution: Use AI prioritization to surface only meaningful structural diffs for human review. Batch-approve superficial style changes (color, font size) that match the design system. Designate multiple reviewers to distribute the workload.
Challenge: Cross-Browser Differences in Baselines
Each browser renders the same component slightly differently. Maintaining separate baselines for Chrome, Firefox, and Safari increases test complexity. Solution: Accept minor cross-browser differences by setting appropriate diff thresholds. Only fail the test when the visual difference exceeds acceptable limits for your product's design consistency requirements.
The Future of Visual Testing for React in 2026
Visual testing React 2026 is evolving rapidly. Three trends are reshaping how teams approach visual quality.
AI-native testing is moving beyond diff analysis to test generation. Instead of writing tests, developers describe what they want to test in natural language. The AI generates the test code, captures the appropriate screenshots, and maintains the baselines automatically. This reduces test maintenance costs and makes visual testing accessible to developers who aren't testing specialists.
Design system integration means visual tests will automatically sync with component libraries. When a design system updates a component's style, the visual tests for all consuming applications automatically regenerate baselines. This eliminates the manual work of updating hundreds of component tests after a design system change.
Real-device and real-browser coverage will become the standard. Emulated viewports catch some issues but miss hardware-specific rendering differences. Cloud-based real device testing integrated with visual diff tools will give teams access to hundreds of device and browser combinations without managing device labs.
Lastest is positioned at the intersection of these trends: AI-powered test generation, open-source flexibility for design system integration, and Docker-based deployment that can run on any infrastructure. As visual testing becomes a standard practice for React teams, tools that combine AI, open-source, and self-hosting will dominate.
Conclusion
Visual diff testing for React components is the missing layer that catches UI regressions before they reach users. In 2026, with React applications more visually complex than ever, unit tests and Jest snapshots are no longer sufficient. Visual diff testing catches layout shifts, color mismatches, font rendering issues, responsive breakpoint failures, and animation glitches that traditional testing approaches miss.
The key takeaways from this guide:
- Start with free open-source tools like Lastest's self-hosted version (FSL-1.1-ALv2) to learn visual testing without financial commitment
- Use AI-powered diff analysis to reduce false positives and prioritize meaningful structural changes
- Integrate into CI/CD to catch visual bugs before code merges, not after deployment
- Test at the component level for focused, actionable diffs
- Maintain baselines carefully with a systematic review workflow
To get started today, deploy Lastest's free self-hosted version with Docker and wire it into your Playwright suite, or try Lastest Cloud at a flat $299/month and skip the ops entirely. Either way you get three diff engines, AI test generation with zero-token replays, 7-layer self-healing selectors, and a single human review seam. The full source lives on GitHub. Your users will thank you when the checkout button stays exactly where it should be - on every browser, at every viewport. New to visual regression testing? Start with the live demos.